When you're in sales, time is money, and every second counts. To stay on top of your rapidly growing pipeline, your sales team needs to maximize efficiency wherever possible.
Airtable apps help you save time by letting you build and customize a base that's tailor-made to your team's sales processes. With a single source of truth, you won't have to waste time switching back and forth between dozens of different tools, and you can focus your energy on closing your next deal.
Follow these tactics to step up your game:
Drag and drop to import new contacts
Flesh out your contact list
Keep your shortlist front and center
Track opportunity status across sales owners
See the total value of closed deals
Automate your sales gong
Drag and drop to import new contacts
Any salesperson worth their salt has a long list of contacts. The good news is that with the contact import app, you can import all those contacts into Airtable with just a few clicks.
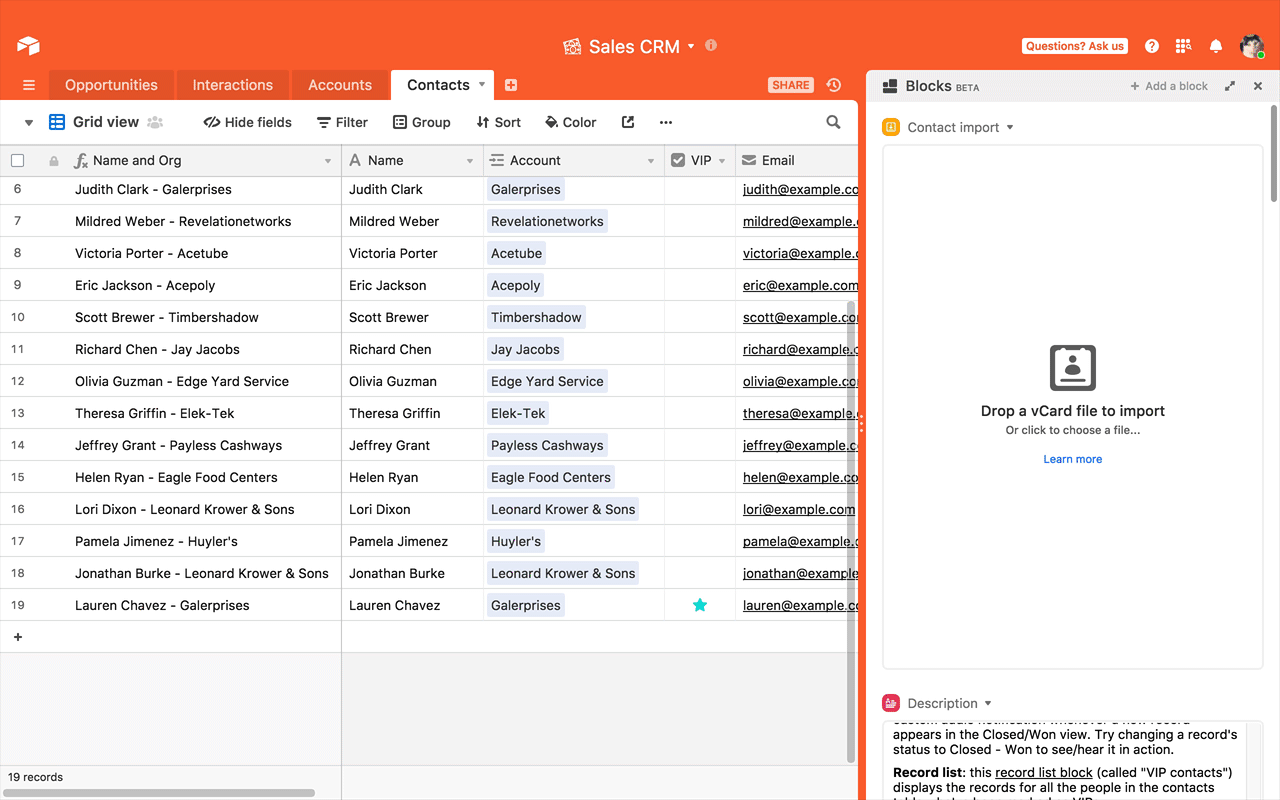
Step 1: Create a contacts table.
If you don't have one already, create a table that holds contact names and details like email address, phone number, title, and company.
Step 2: Add a contact import app.
Open the apps menu, choose the add a app option, and add a contact import app to your base.
Step 3: Drop a contact onto the app.
Drag and drop a vCard file on your Airtable base, select your contacts table, and map out which values you want to import to which fields. When you're ready, click the Create records button.
Bonus: the app will remember your field mappings the next time you import another vCard file, meaning that any future imports will be even faster.
Flesh out your contact list
No matter how long your list of contacts might be, you still need contextual information to supplement your names and email addresses—how else will you know which leads are the most promising? With the Clearbit app, you can use the Clearbit API to discover new leads by email domain, or to enrich your existing contacts with additional info about their titles, roles, and social media profiles.
Step 1:
Select the add a app option from the apps menu, then add a Clearbit app to your base. Note that you need a working Clearbit API key to use this app. Usage of this app may incur fees from Clearbit.
Step 2:
Input your Clearbit API key and choose whether you'd like to work with the Prospector API (to create new records for new leads) or with the Enrichment API (to update existing records with new information).
For Prospector, enter at least one email domain, and optionally names or titles, to search.
For Enrichment, you'll need to select the table, view, and field in which the email addresses you'd like to enrich are located.
For both options, you'll click Search, confirm the Clearbit charges, and choose how you'd like to map the information to your tables.
Keep your shortlist front and center
Looking for a way to quickly access your most recent customer interactions? The record list app makes it easy to surface records from important views and keep the most urgent and important deals top-of-mind.
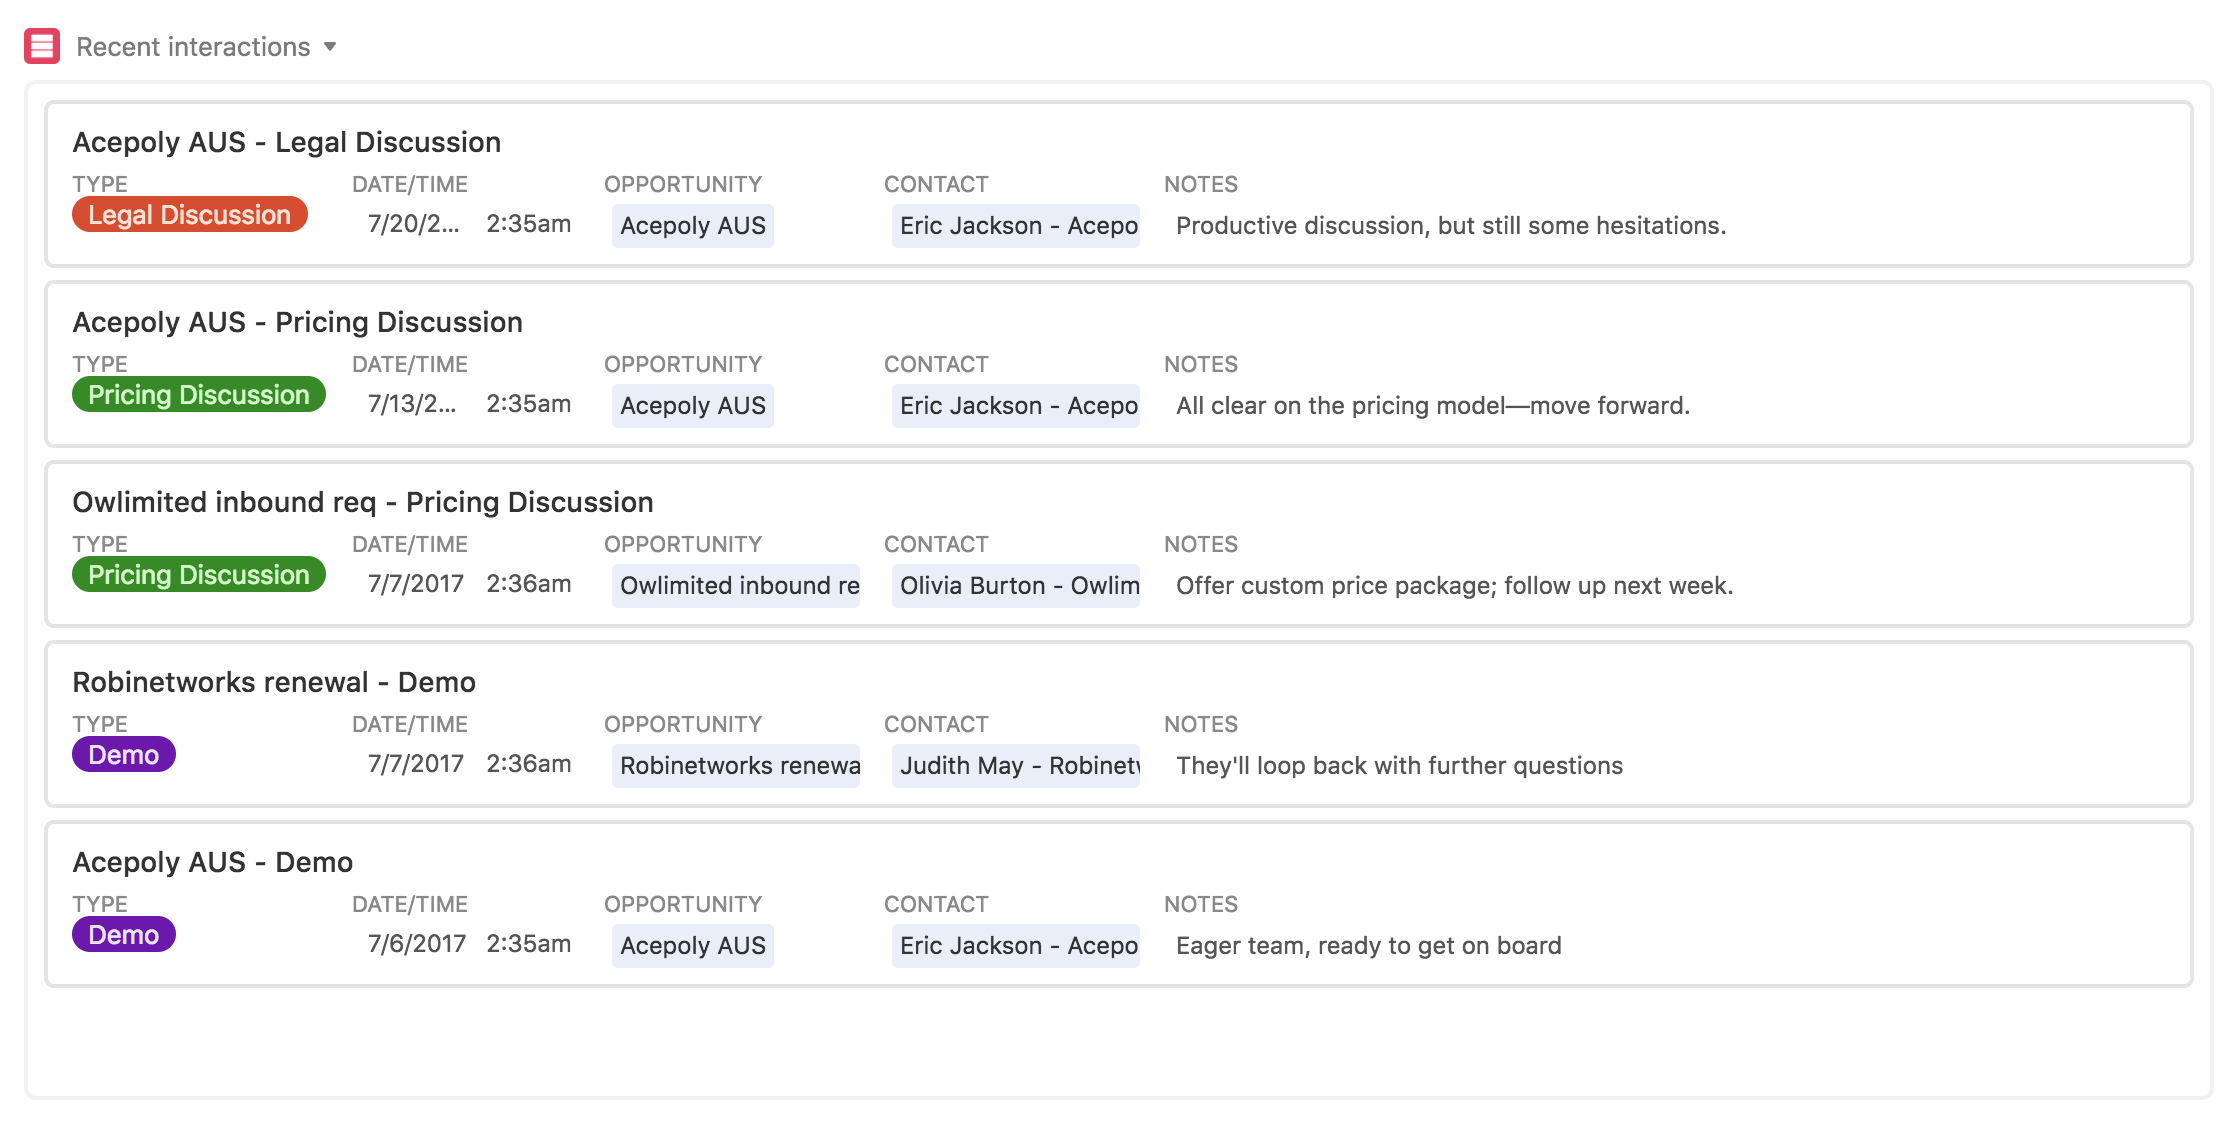
Step 1: Create a table for tracking interactions.
If you don't already have one, create a table that holds interactions with customers, including details like the date of the interaction.
Step 2: Add a record list app.
Next, choose the add an app option from the apps menu, and add a record list app to your base.
Step 3: Configure the record app.
From the dropdown menu in the record list app's settings, select the table you created in Step 1. To match the above example, apply a sort to the app to show records in reverse chronological order, and limit the number of records to show the last five interactions.
Track opportunity status across sales owners
With the chart app, you can visualize any and every aspect of your sales process to gain insights and spot pain points. Try comparing your salespeople's effectiveness, or seeing how much potential MRR you have sitting in each stage of the pipeline.
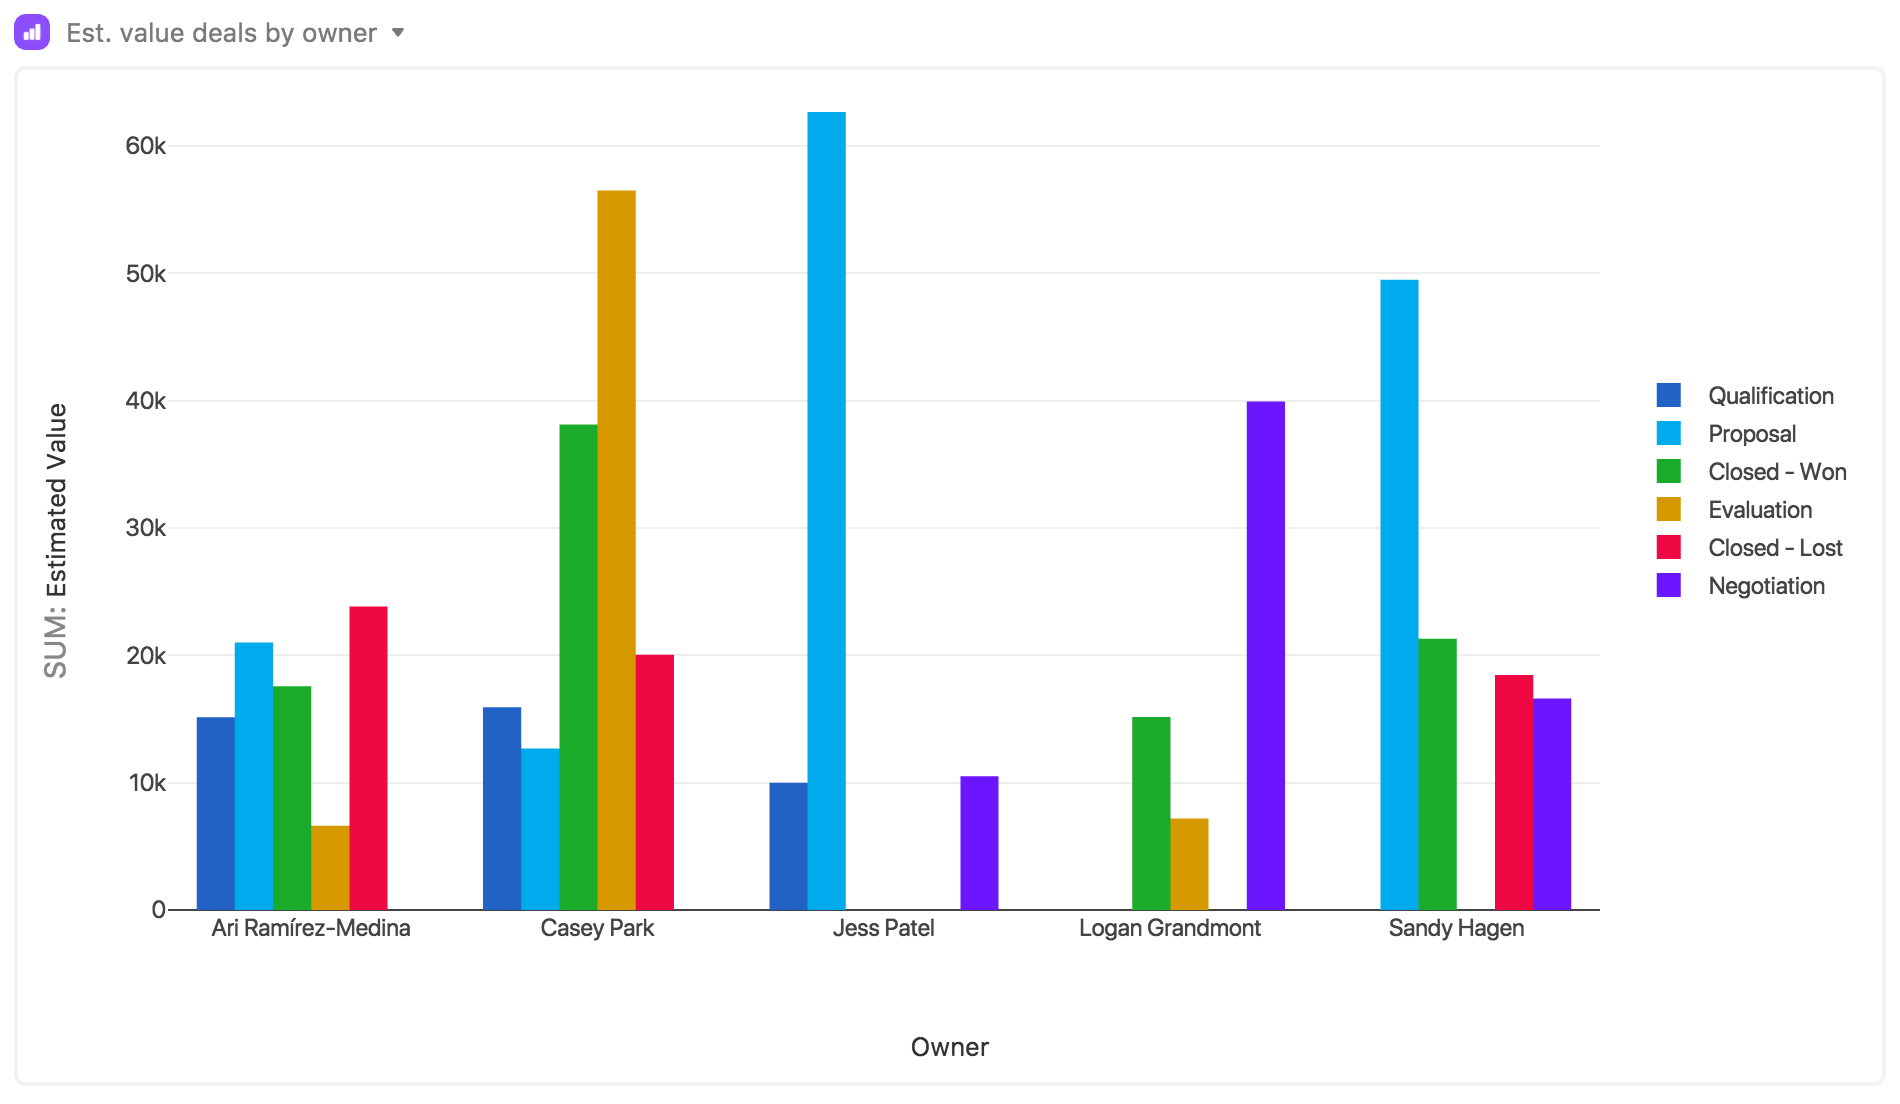
Step 1: Make a table for opportunities.
If you don't already have one, make sure that your base has a table for tracking opportunities and their owners, value, and current status.
Step 2: Add a chart app to your base.
Open up the apps menu, click the add an app option, and add a new chart app to your base. With the chart app, you can make a bar chart, a line graph, or a scatter plot.
Step 3: Adjust the chart app to fit your needs.
Once you've added the chart app, you can tweak the settings to match your needs. We suggest a bar chart for quickly seeing the value of deals across sales owners. But of course, you can pick whichever type you want.
If you're doing a bar chart, we recommend that the Y-axis be the sales owner, and the X-axis be a currency field showing deal value. Take it a step further by grouping by current status, to show value across your pipeline.
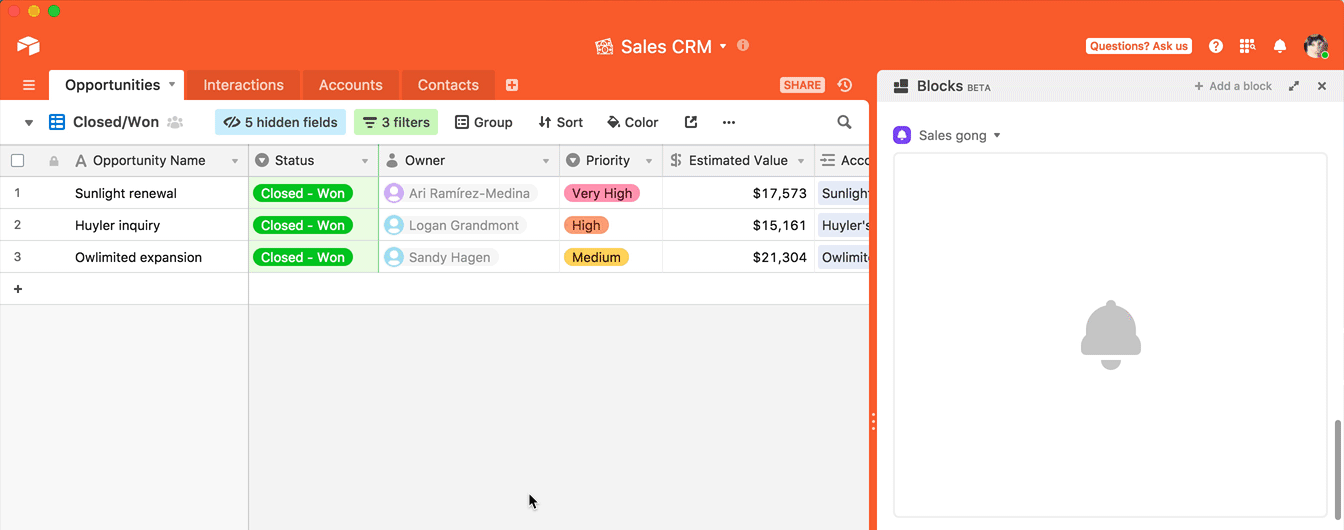
See the total value of closed deals
It's easy to get bogged down in the details of the day-to-day, which is why it's so important to surface the numbers that matter for the big picture. The summary app allows you to call out a specific summary value from your records and turn it into a big, colorful number to be displayed prominently on your dashboard. You can use it to track your performance against a quota, or any other number that matters to your team.

Step 1: Make a view of closed deals.
Make sure you have a view in your table that's filtered to show only opportunites that your team has closed.
Step 2: Add a summary app.
Head to the apps menu, choose the add an app option, and add a summary app to your base.
Step 3: Customize your app.
Pick the table and view from Step 1 and choose the Summary option. Now select the field that holds the number you'd like to summarize, and the function you'd like to apply (in the example above, we chose Sum. You can also customize the color of your number, and add a label.
Automate your sales gong
When you've finally closed that big account, you're going to want everyone on your team to know about it. Chime app, which plays a custom audio notification every time a record enters or exits a specified view, can be easily set up to trigger when a deal gets closed—and yes, you can make it sound like a gong.
Step 1: Add a chime app.
Click the add an app option in the apps menu, and add a Chime app to your base.
Step 2: Shower your team with praise.
Point the app toward the view you created for the summary app, and choose the visual and audio options you'd like. Now when a new deal is closed, it'll trigger your chime.