Deadlines: everyone needs them, nobody likes to miss them.
Mistakes happen, and deadlines aren’t always met. Creating a deadline-management system is crucial to keep the gears turning and ensure everything gets out the door on time—whether it’s a product launch, blog post, or marketing campaign.
How to prioritize deadlines in Airtable
Managing deadlines shouldn’t make you feel like you’re drowning, or stuck in a winding labyrinth. Visual tools and project management software can highlight what’s most important—that’s why we’ve put together a list of five quick tips you can use in your base right now.
With Airtable’s big picture updates, you have the tools to not just manage your deadlines, but own them.
Learn how to set SMART goals with Airtable.
1. Add the Countdown app
Airtable apps help users visualize their information in unique and colorful ways, and the Countdown app accomplishes this with a big countdown clock. Having a giant number sitting in your base can be a helpful reminder of how much time you have left before your big launch or writing deadline.
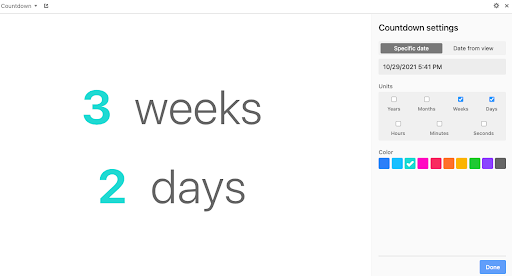
With the Countdown app (available to all Pro plan users), you can set the app to count down to a specific date, or to a date already listed in a view. The next step is to use the units section to specify whether you want to count down from years to weeks to hours… even seconds, if that’s what’ll keep you motivated. Finally, select a color for your countdown.
You now have 3 minutes and 43 seconds to finish reading this blog (just kidding!)
2. Track your workload with Timeline view
Juggling multiple projects at once? Don’t freak out just yet—Timeline view makes time management easier by letting you track competing or overlapping dates.
This view groups records by fields and displays them side-by-side horizontally so you can see when one task ends… and another begins. If you have overlapping tasks, records stack on top of each other so you don’t miss a thing.
This view is also ideal for allocating resources. If you're a team lead, for instance, you can make sure your team’s workloads don’t get too heavy by grouping and viewing records by assignee. Taking a few tasks off one team member’s plate and passing them to someone with time to spare can prevent slowdowns.
3. Create a view for your “to do” list
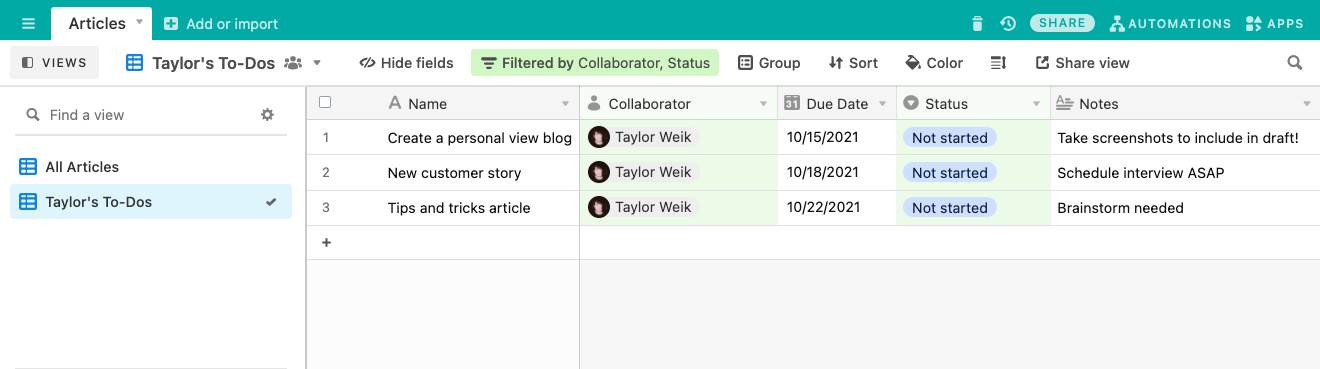
It can be a doozy to handle tasks when your base is filled to the brim with records. Having so much information in a base can be overwhelming; creating a view where you only see the tasks that you need to complete can keep you deadline-oriented.
Open the view dropdown in a table by clicking the view button in the top left, and create a new grid view (don’t forget to title it). Then, filter out all the irrelevant information. Because you want to see only what’s assigned to you, add a condition where you’re the collaborator. To see upcoming tasks, you can add a condition where the status is something like “not started,” or you can specify a due date.
Great! Now when your team base is updated, your “to do” list will automatically update to reflect upcoming tasks. A focused list makes it easier to spot your action items and, you know, act on them.
4. Automate reminder emails or Slack messages
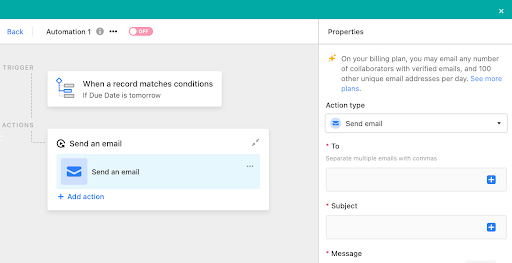
Do Future You a solid by configuring an automation that sends a reminder as your deadline approaches.
When you add a new automation, you'll be asked to set a trigger and an action. For the trigger, choose “when a record matches conditions” and set the due date to “tomorrow” (or one week from now… you decide). The action will be “send email,” which lets you add an email, subject, and message. Choosing Slack as your action lets you add a customized message and plug it into a channel. Now you’ll receive a helpful reminder in your inbox the day before a deadline, just in case.
And if you do end up missing a deadline (it happens)...
5. Flag overdue records with colors
Know when your deadline has passed by assigning colors to overdue records. Pro plan users can brighten up their records by clicking the color button at the top of a base and selecting conditions. Choose a color (like bright red to convey urgency) and add several conditions to narrow down the list of records.
Say you want to flag overdue articles in a content calendar. In this case, you’d add several conditions: one where the status of the record is “not published,” and another where the publish date is before today. Any record that fits these conditions—that is, articles that haven’t been published and were due prior to today—will immediately be marked red.
Flagged records allow you to quickly deal with overdue tasks and identify any blockers, both of which can help you better manage time.
Put our tips to the test! Upgrade to an Airtable Pro plan today so you can start using premium features like apps, automations, record coloring, and Timeline view.