Airtable's a great place to organize your work. Slack's a great place to talk about it. Zapier's known for connecting to great things to one another, and Zapier's new Slack Action makes it even easier to save specific Slack messages to an Airtable base. It just takes a little setup and the push of a button. Let's give it a try!
As an example, we'll set up a workflow to track pitches in an editorial meeting. Whenever anyone wants to save a pitch, they can use this workflow to push a button and send that pitch from Slack to Airtable as a new record.
Watch this video or read on for more information!
What you'll need
You'll need a few things in order to connect everything so let's make sure it's all in place first: an Airtable account; a Slack channel (either one that you control or one that permits you to add apps to it); a Zapier account; and your Airtable API key (located on your account page)
That's it! Once you have all your accounts and your Airtable API key ready to go you're ready to get started.
Step one: set up your Airtable base
Before connecting everything you need to set up a base in Airtable so you can store messages containing pitches for articles from Slack. You don't need to make anything complicated—one table with just a few fields will do. Here's an example:
As you can see, the base simply logs the original message (the pitch) with the name and email of its originator as well as any comments that were added by the person who pushed it from Slack to Airtable.
Once you've got your base set up just the way you like it, we can head on over to Zapier to tell it when and where to put pitch messages from Slack.
Step two: connect Slack
After logging into Zapier, create a new Zap and search for and choose Slack as your trigger. If you haven't set up Slack in Zapier before, you'll need to connect Zapier to your Slack team. (If you didn't create the team yourself, make sure you have permission to add apps)!) Zapier will walk you through the process, which involves little more than signing in and giving consent.
Once you've made the connection, select the New Pushed Message trigger. Zapier requires sample data to work with, so after you've made your selection and continued to the next part of the process you'll need to push a message to Zapier to work with.

Before you do, make sure you see the “Pulling in Samples” message (pictured above) so you know that Zapier's ready to go.
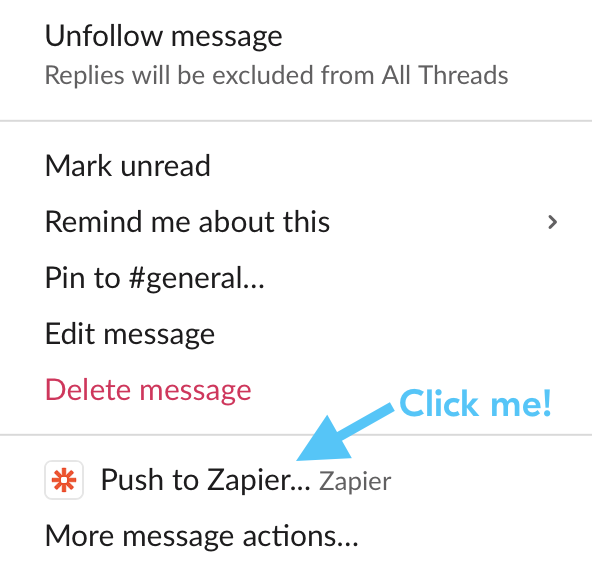
From there, create (or locate) a message in your connected Slack channels and click the ... (ellipsis) on its right side. This will display the contextual menu pictured above. Choose the Push to Zapier... option to bring up the next step.
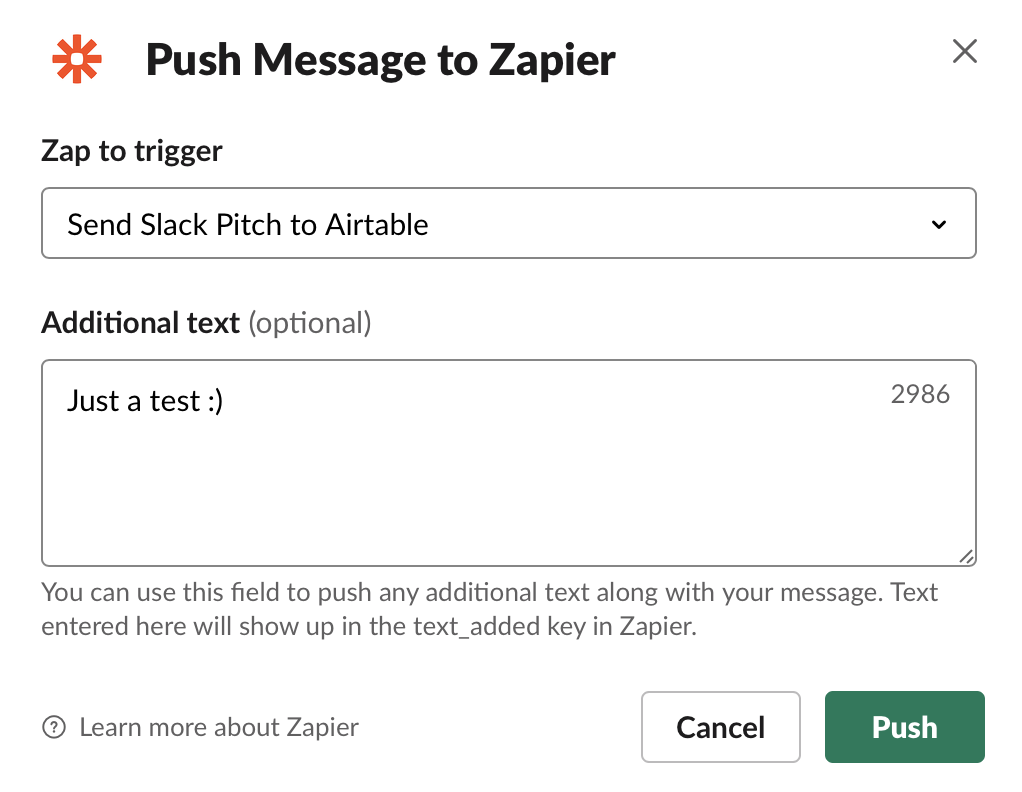
If you selected everything correctly, you'll see a dialog box that asks you to choose the Zap you want to use to handle the pushed message and a dropdown menu containing the Zap you're in the process of creating right now. Choose it, then enter any additional details you like in the text box. When you're ready, click the Push button and head back over to Zapier.
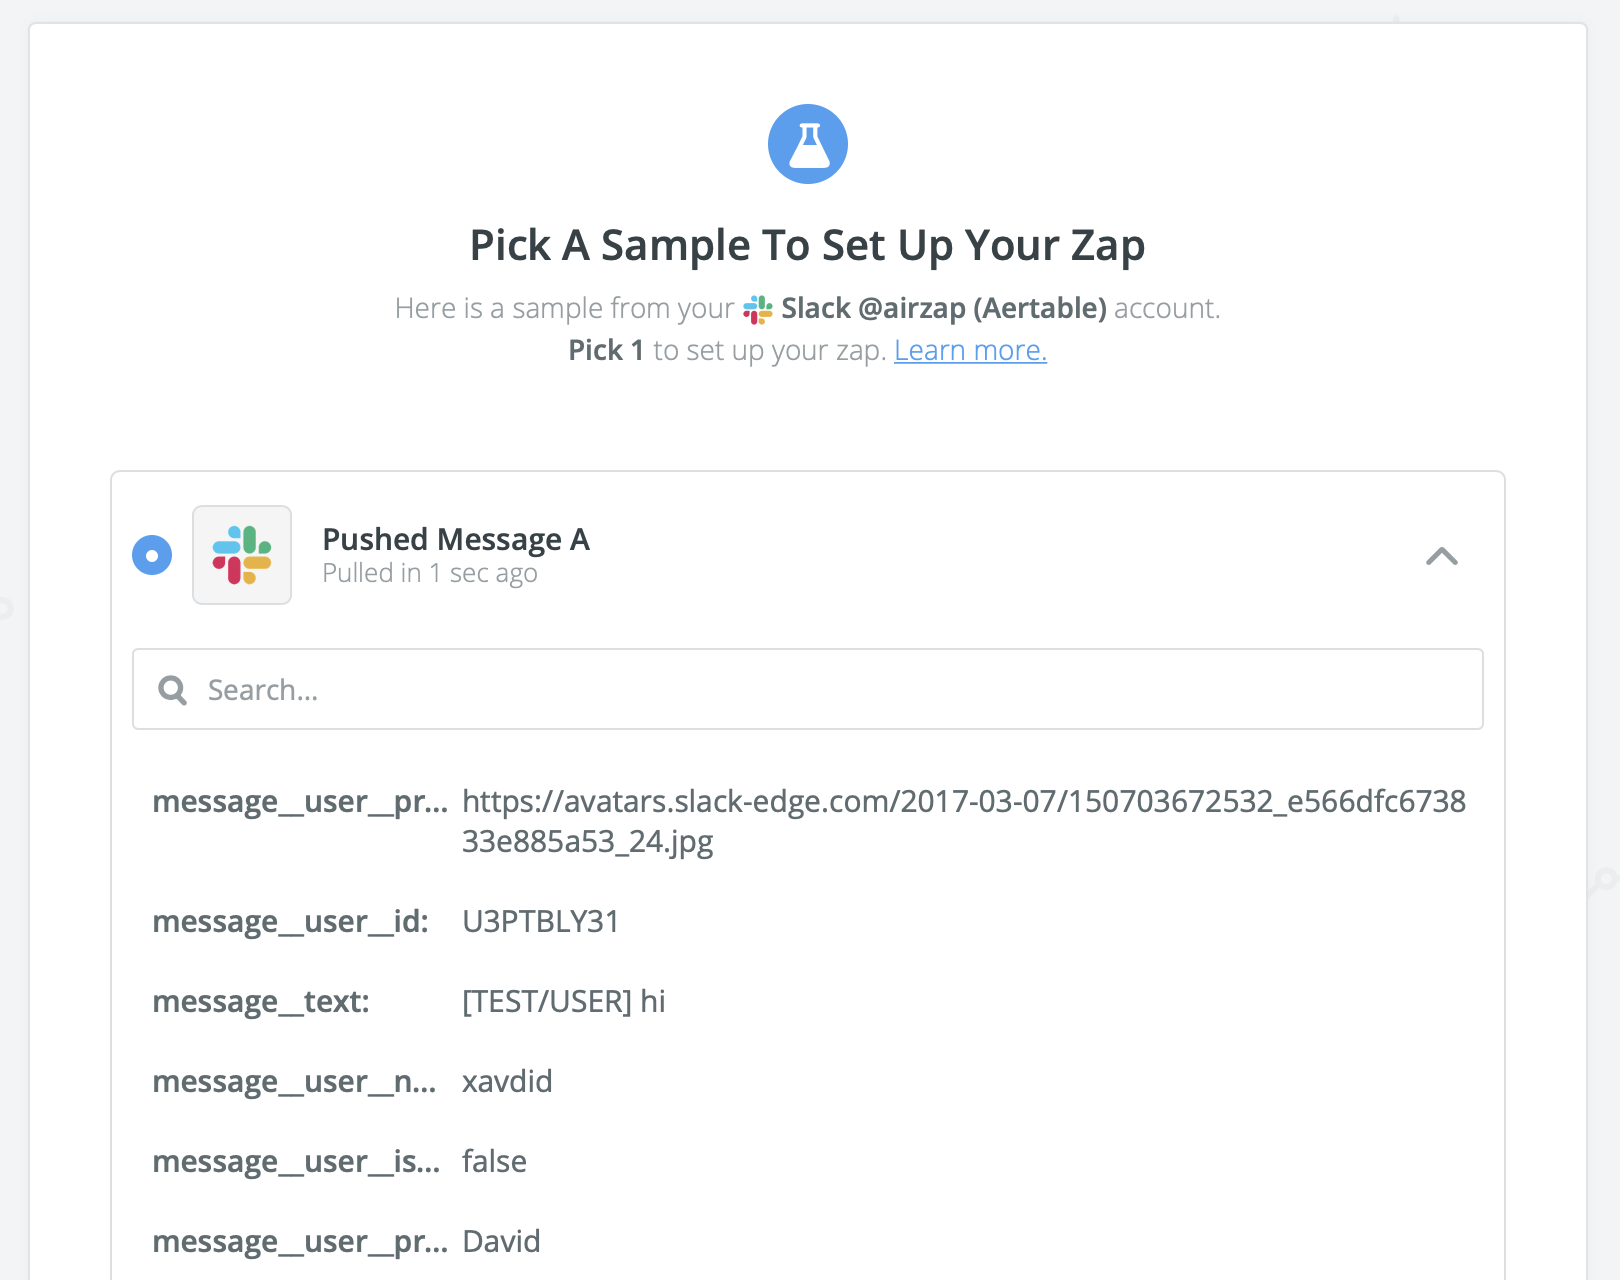
Back in Zapier, you'll find your message and its metadata. It will be labeled Pushed Message A (unless you've pushed multiple messages). Select it, click Continue, and you're done.
Step three: format the message (optional)
Now that you've got all your data in Zapier you only need to tell Zapier how to provide it to Airtable.
First, add a new step, then search for and add Airtable. If you need to connect your Airtable for the first time, Zapier will prompt you to do so just like it did with Slack. Instead of signing in, however, you'll need to provide the Airtable API key you gathered at the beginning of this article. Paste it in when prompted and Zapier will finish making the connection for you.
Once connected, choose the Create Record action. Zapier will prompt you to test your Airtable account. Click the Test button to make sure everything's working and then move on.
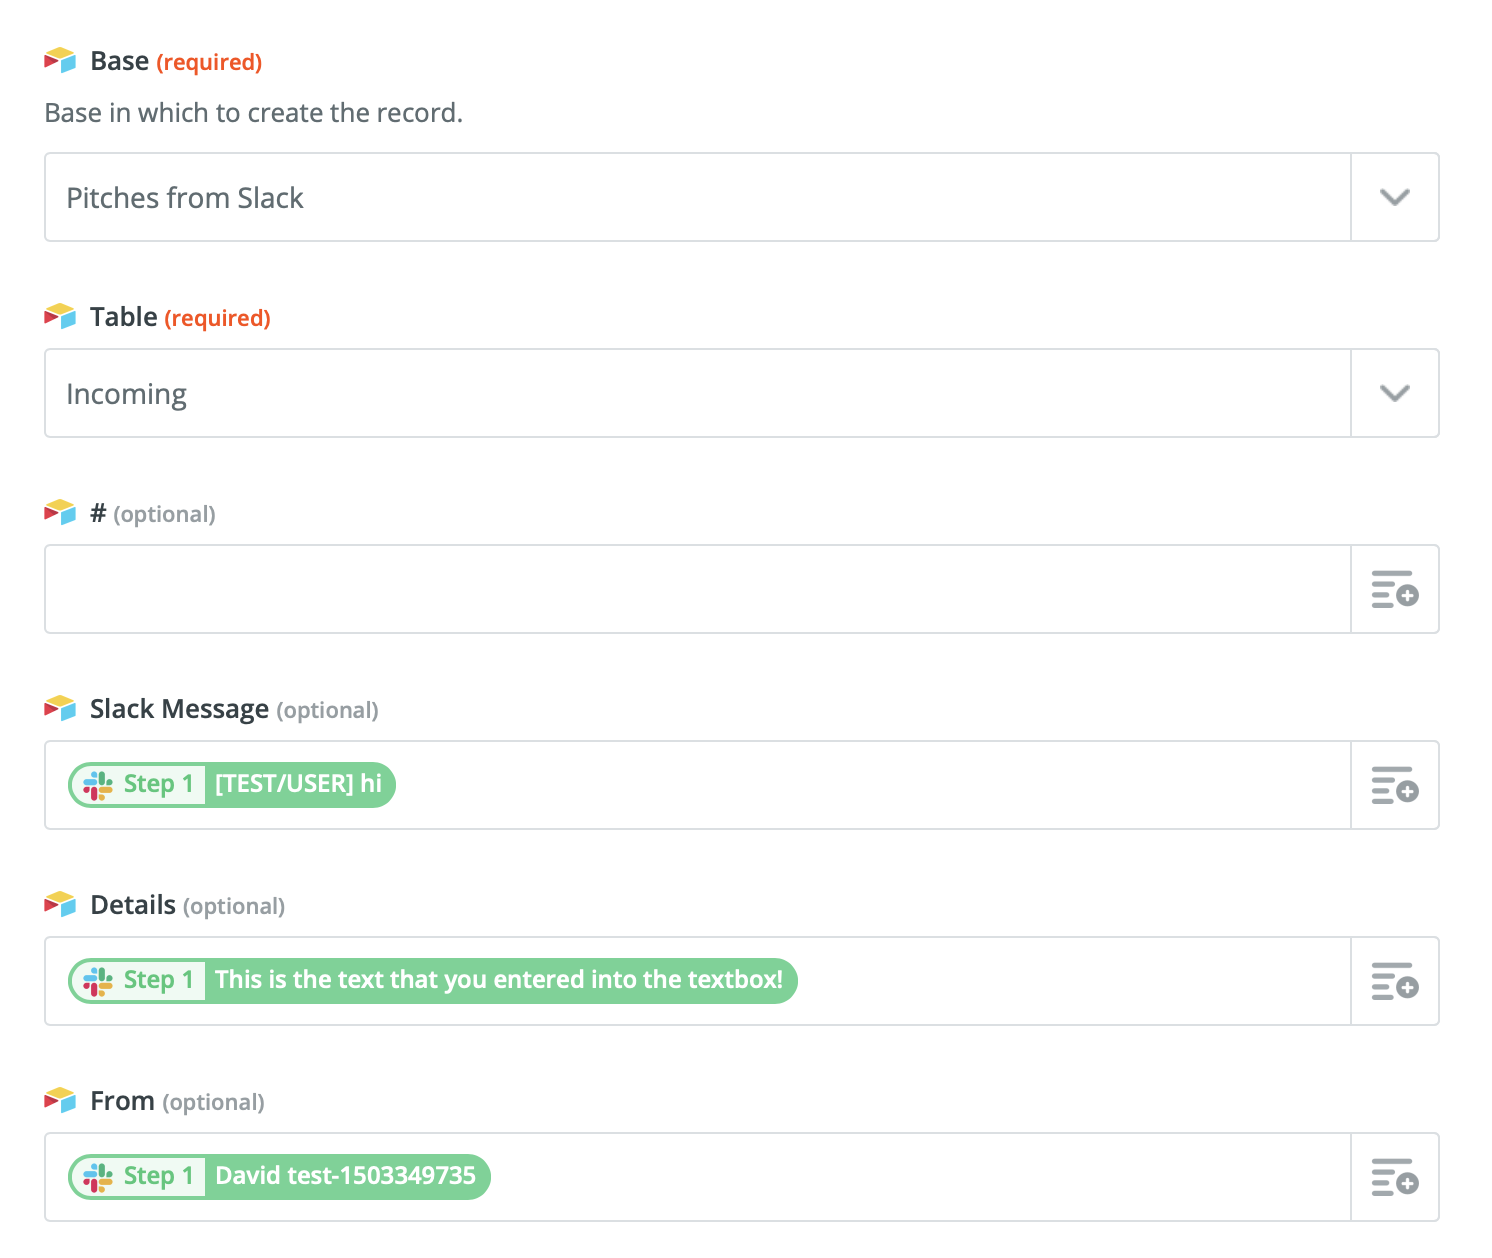
To start, choose the base you created earlier from the Base dropdown menu. If it isn't selected automatically, choose the Incoming table (or whatever name you chose for it).
Once you do, Zapier will load all the available fields. To fill them out (similarly to the screenshot above) just click on the button at the end of each text field and choose the relevant information gathered from Slack in step one. For example, in the screenshot above you'll see the original message added to the Slack Message field, any additional details added to the Details field, and so on. Your version should be very similar if not identical.
Once you've filled out the desired fields, click Continue, test the step, and check Airtable to make sure a new record was added with all the information you set up in Zapier. If it did, you can click Finish in Zapier to turn your Zap on. Now, whenever you push an editorial pitch from Slack using this Zap you'll find it in your Airtable base instantly!
What's next?
We've just looked at one way you can funnel Slack messages into Airtable using Zapier, but you've surely noticed numerous other triggers that Zapier provides for Slack. If you have other types of messages you want to send to Airtable, explore those triggers and save all kinds of new records. This article offers a very simple workflow to get you started, but with a tiny bit of extra effort you can add plenty of Zaps that'll help you get things done more efficiently.