It's a truism in sales that customer relationships are the foundation of a great business. That's why CRM systems are critical for salespeople: keeping contact relationships organized in a central location is a prerequisite for converting personal connections into actionable business plans.
Taking a step back, though, you can make the more general observation that personal relationships form the foundations of all types of work, not just sales. Even if your role isn't one where you're working directly with clients or customers, you're probably working with team members, freelancers, users, vendors, or donors—in other words, other people—and you can also reap the benefits of managing all these relationships in a central location.
This might sound familiar: you have a group of docs or spreadsheets in which you're doing your work; separately, you have a doc or sheet where you're storing the contact information of the people you're working with. When these collections of information lead separate lives, it's easy to waste time continually switching back and forth—or worse, for information to get lost in the cracks. The better solution is to bring your projects and contact lists together into a single, integrated tool tailor-made for your team's workflow.
Purchasing dedicated CRM software is probably overkill for those of us who aren't living and breathing quotas and commissions. The good news is that you don't need to invest a ton of money and time into learning new and complicated tools. With just a few steps, you can build a CRM directly into your existing Airtable project workflow—and immediately start reaping the benefits of having a single source of truth for your relationships and your projects.
In this example, we'll add a CRM for managing freelancers to an editorial content pipeline, but you can use the techniques outlined here for nonprofit management, user studies, event marketing, project management, or any other workflow which involves relationships with people.
Making a connected contacts table
The very first step to adding a CRM to any project workflow is creating a separate table for contacts that can be linked to your other tables. A linked contacts table not only enables you to store information specific to each person in an organized fashion, but also ensures that you can easily access this information from other tables—it's the foundation of any CRM.
If you have a separate spreadsheet with a list of contacts, you can import it into an existing Airtable base as a new table.
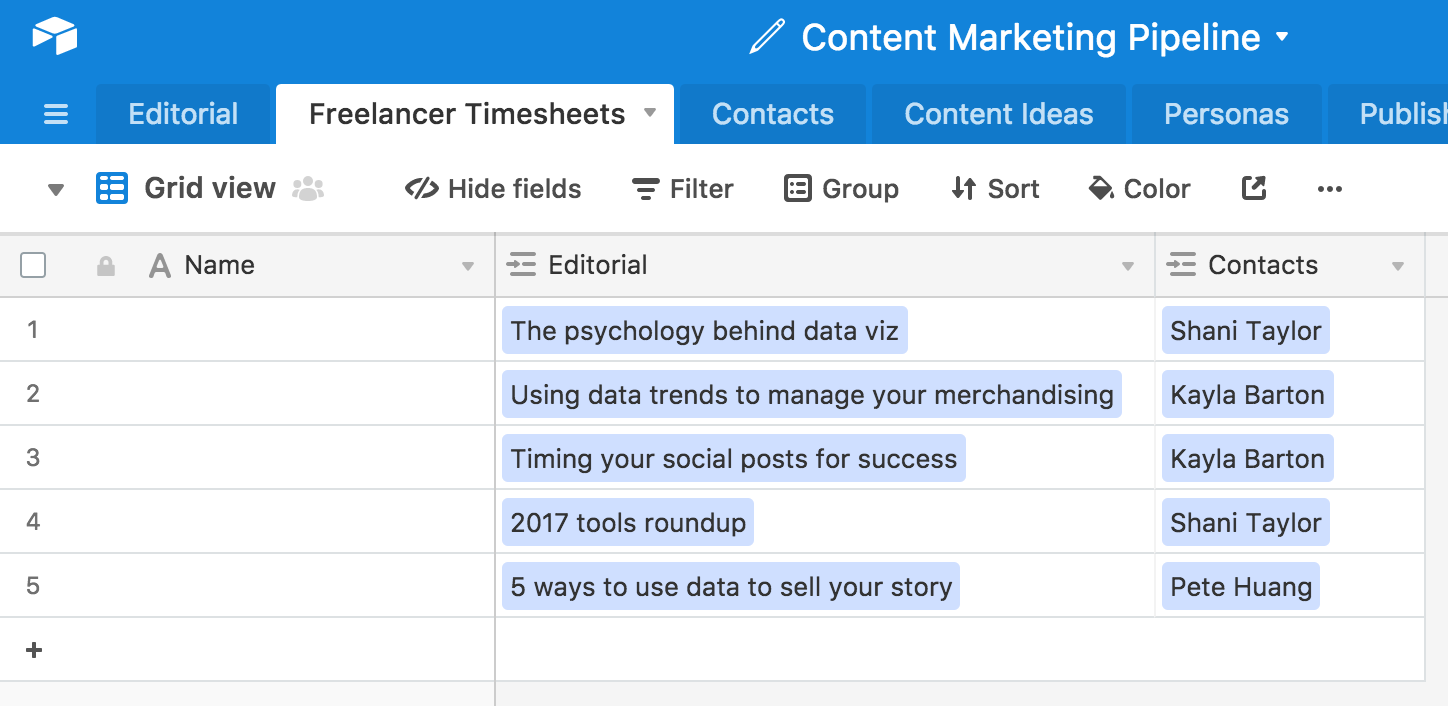
Once you've created a contacts table, you can link it to existing records in other tables with just a few clicks. All you have to do is go to the table you'd like to connect to your contacts table, find a field of contact names, and link that field to the contacts table by using the field customization menu.

If you don't have a spreadsheet of contacts handy, you can turn a field of people's names from any existing table into its own new contacts table—just open up the field customization menu, choose the Link to another record option, then choose to Create a new table instead of linking to any existing tables.
Creating a well-organized contacts table is useful because it makes contact information accessible from other tables with a single click—not only will you no longer need to switch back and forth between different programs, you won't even need to leave your table.
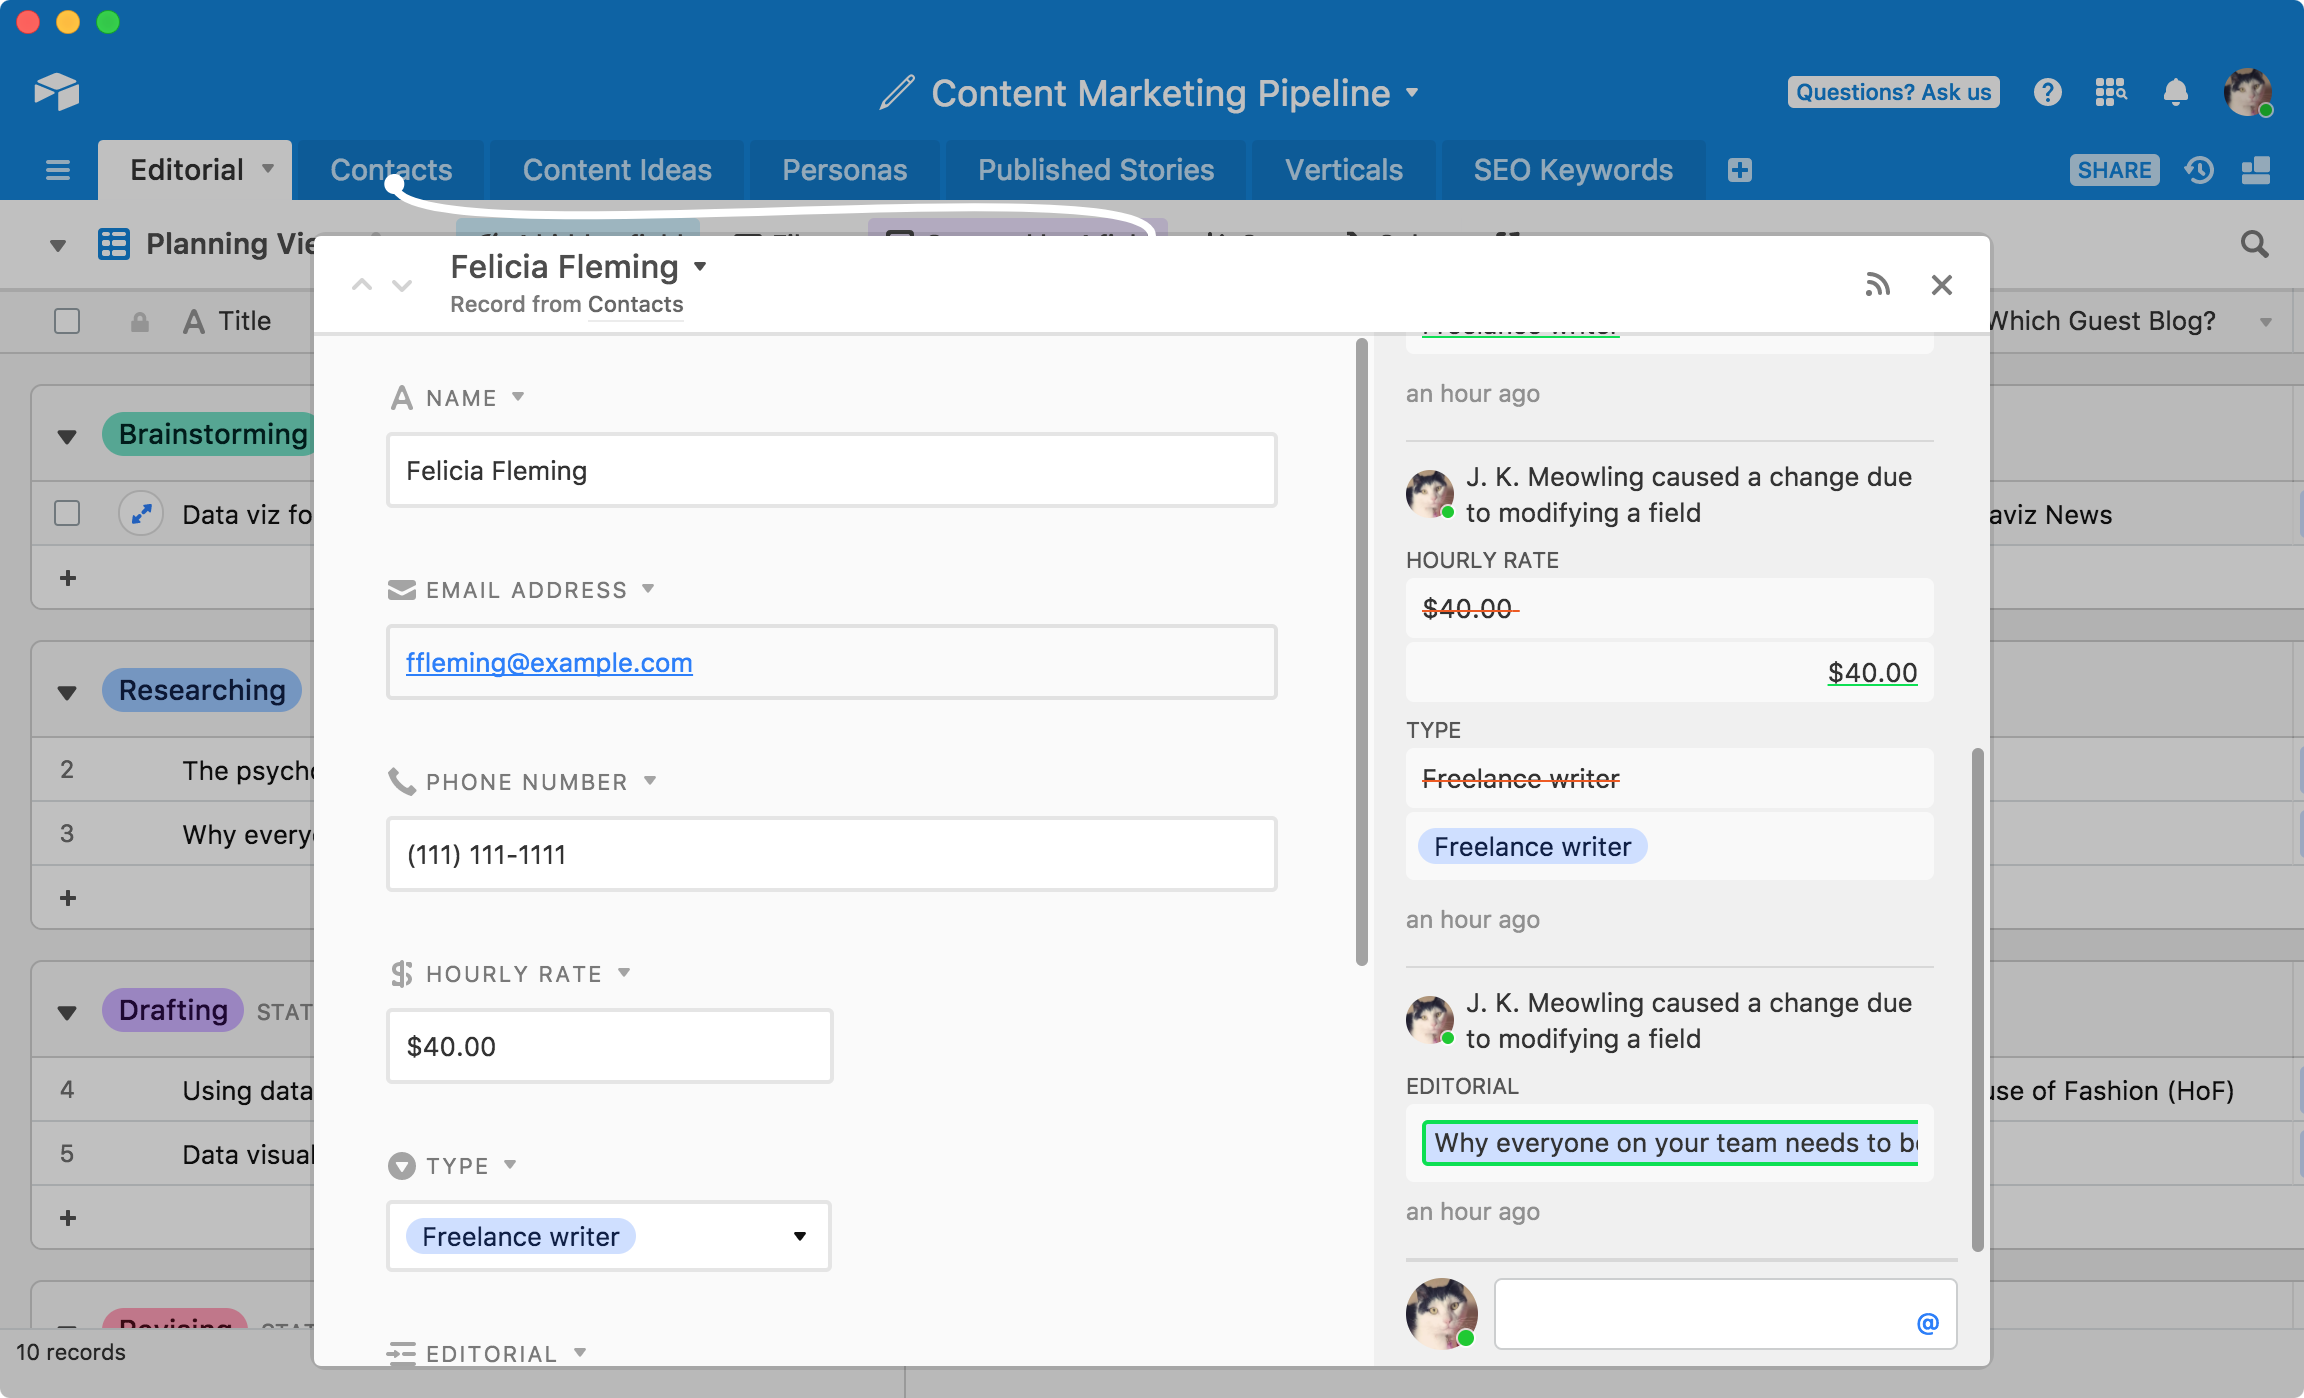
Still, a CRM is a customer relationship manager, and while we've touched on the “customer” part by talking about building a table of contacts, we've yet to scratch the surface of the “relationship” part.
Building an interactions table
Once you have a contacts table built out, it becomes easier to store information about the people who are important to your workflows. You can also add new fields to your contacts table as necessary to fit your team's needs—like for your contacts' birthdays, interests, mailing addresses, and so on.
However, in many cases, you'll want to capture more information about the specifics of your relationships with your contacts than can be conveyed in a single field or two, and you start to run into problems.
For example:
- In sales: when was the last time someone on the team contacted Client X, and what was the nature of that contact (email, phone call, in-person)?
- When managing freelancers in a content pipeline: when was the last time we contacted this freelancer? Overall, how much have we paid them, and how have each of their pieces performed?
- For event marketing: when was the last time this VIP attended one of our events? Did we give them swag the last time we saw them? Have they responded to our most recent invitation?
In all these cases, it's difficult to store the answers to these questions in a table that's purely designed for holding contact information. Sure, you can write ad hoc notes in long text fields—but then, it's difficult to analyze the information in those text fields in a structured way. You can have a date field for the last time you talked to a contact, but every time you talk to them again, you lose information about the previous times.
A contacts table is great for storing relatively static information like addresses, phone numbers, and job titles—but it's much less effective at storing information about relationships. This is because relationships are dynamic and constantly changing over time. If you want to capture the information that matters for a relationship, you need to have a table that's structured in a completely different way. In other words: you need an interactions table.
An interactions table is designed to store information related to the individual instances in which you or one of your team members communicates with a contact. If your relationship with a contact is like a constellation, each of the interactions you have with that contact is one of the stars comprising that constellation: individual points that possibly don't have much inherent meaning on their own, but when looked at together, define something greater.
From a technical perspective, an interactions table is a junction table designed to store information about the relationships between your contacts and the records in a third table, which can vary depending on the needs of your workflow. To return to our previous examples:
- For sales, an interactions table might connect a table of contacts to a table of deals. Each interaction represents a time you or one of your team members spoke with a particular contact about a particular deal.
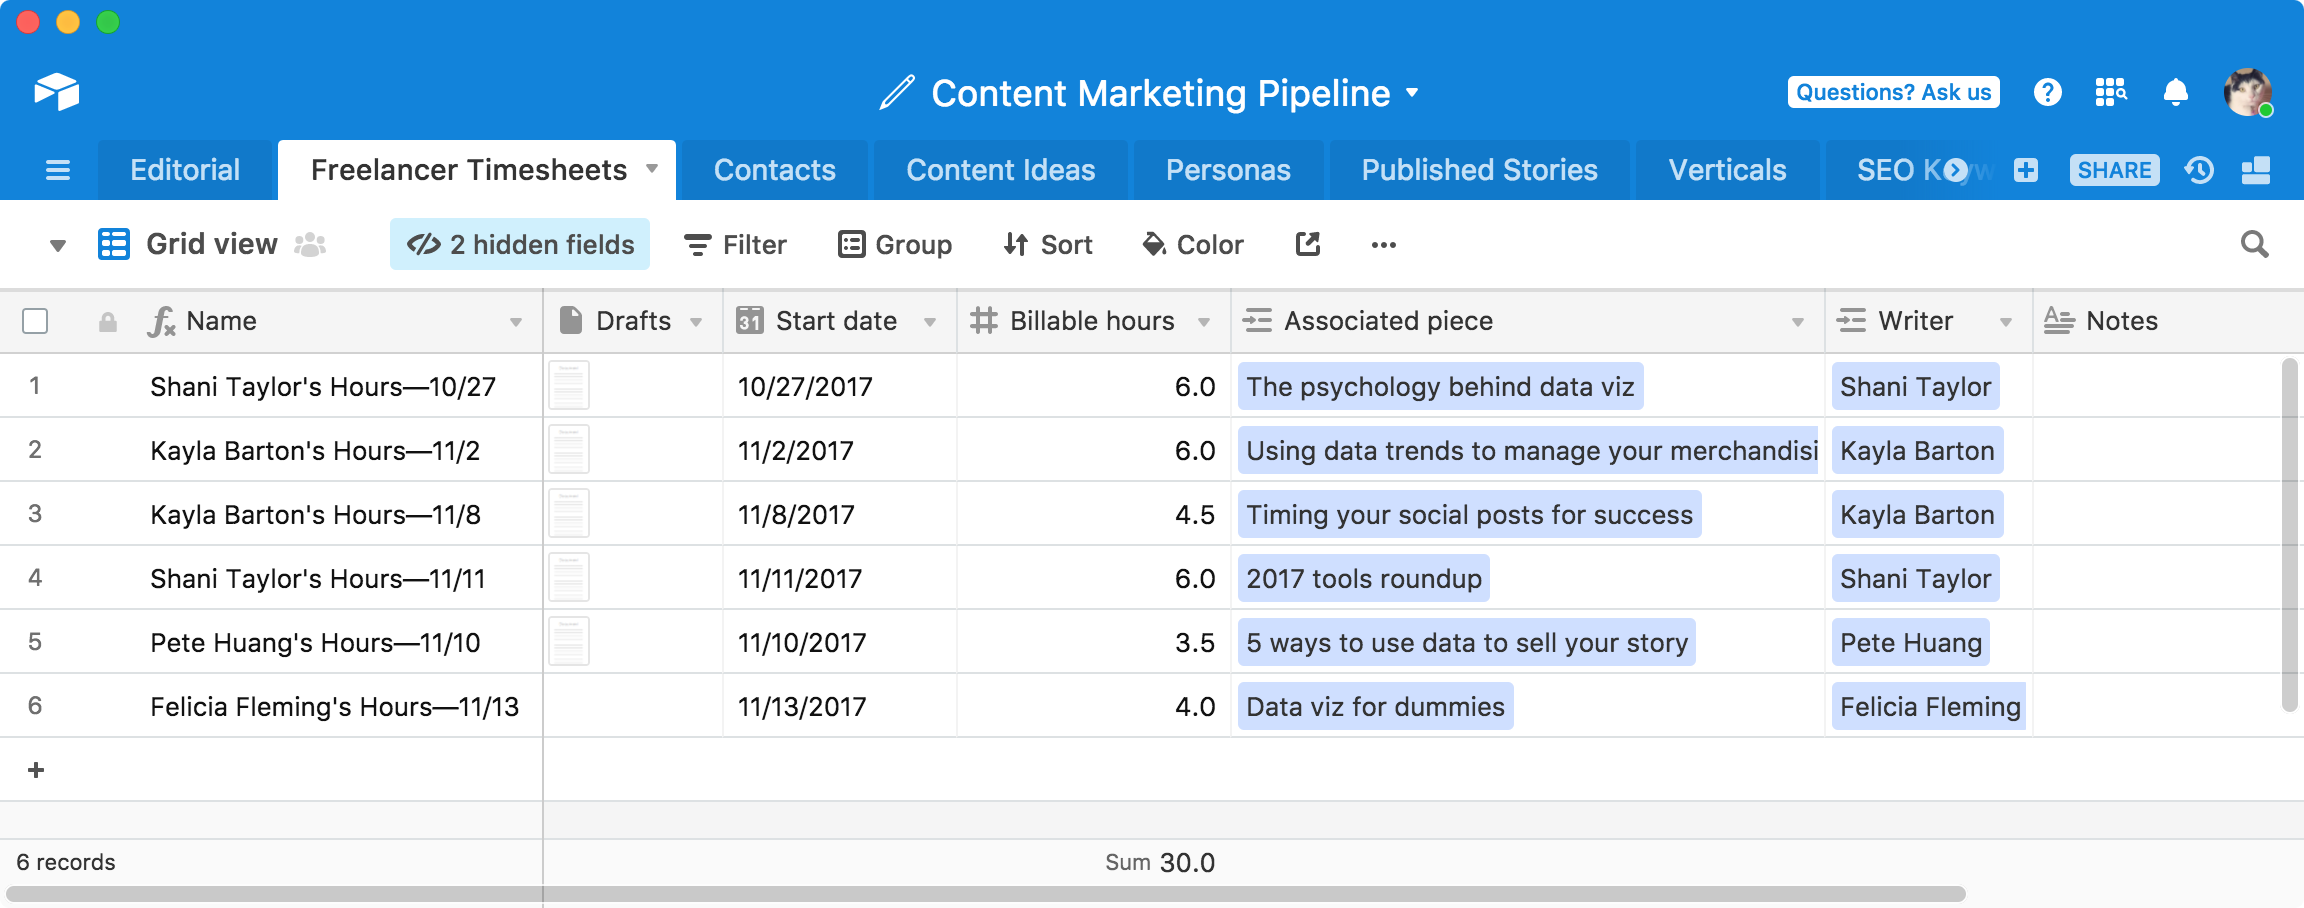
- For managing freelancers, an interactions table might be a table of freelancer timesheets, connecting a table of freelancer contacts to a table of assigned projects. Each record represents a time that a freelancer worked for you on a particular project.
- For event marketing, an interactions table might be a table of attendance records, connecting a table of VIP contacts to a table of events. Each record represents an instance that a you invited a VIP to one of your events.
As you can see, an interactions table can take many forms. Given the wide variability in workflows, it can be difficult to design an interactions table in the abstract—but here are a few steps you can take when designing one for your own workflow.
To begin, you need to decide which two tables you'll link to your interactions table. One of them will be your contacts table, so that decision is easy—but picking the other one can be difficult if you haven't had any practice. Typically, the other table will contain the “projects” your team is working on—where “projects” can be anything from user studies to sales accounts.
Another way of thinking about your workflow that can be helpful is asking yourself: “Why do I interact with my contacts?” The salesperson interacts with their contacts for the sake of making deals; the editor interacts with freelancers for the sake of producing content. This can often give you a hint as to which two tables you should join.
Once you've created your interactions table and linked it to your contacts and project tables, you can start adding other fields to fill out your table and give each interaction some context. Tip: since every interactions table is about tracking relationships over time, in most cases, your interactions table should have a date field.
One of the more difficult aspects of crafting an interactions table is figuring out what to put in the primary field for each of the interaction records. Interactions often don't lend themselves well to unique names, since each record represents a moment like “that phone call I had with a client on January 8” or “when I exchanged business cards with so-and-so at the convention.” In these cases, you can use a formula, which takes data from other fields in the table to compose a unique name for each record.
Once you've built an interactions table, you're in a much better position to get a holistic view of your relationships with your contacts—but to unlock the full power of an interactions table, you'll need to learn to use advanced Airtable features like lookups and rollups.
Surface new insights
Once you’ve linked the contacts and interactions tables, you can use powerful features that automatically surface new insights and identify which relationships need attention, when.
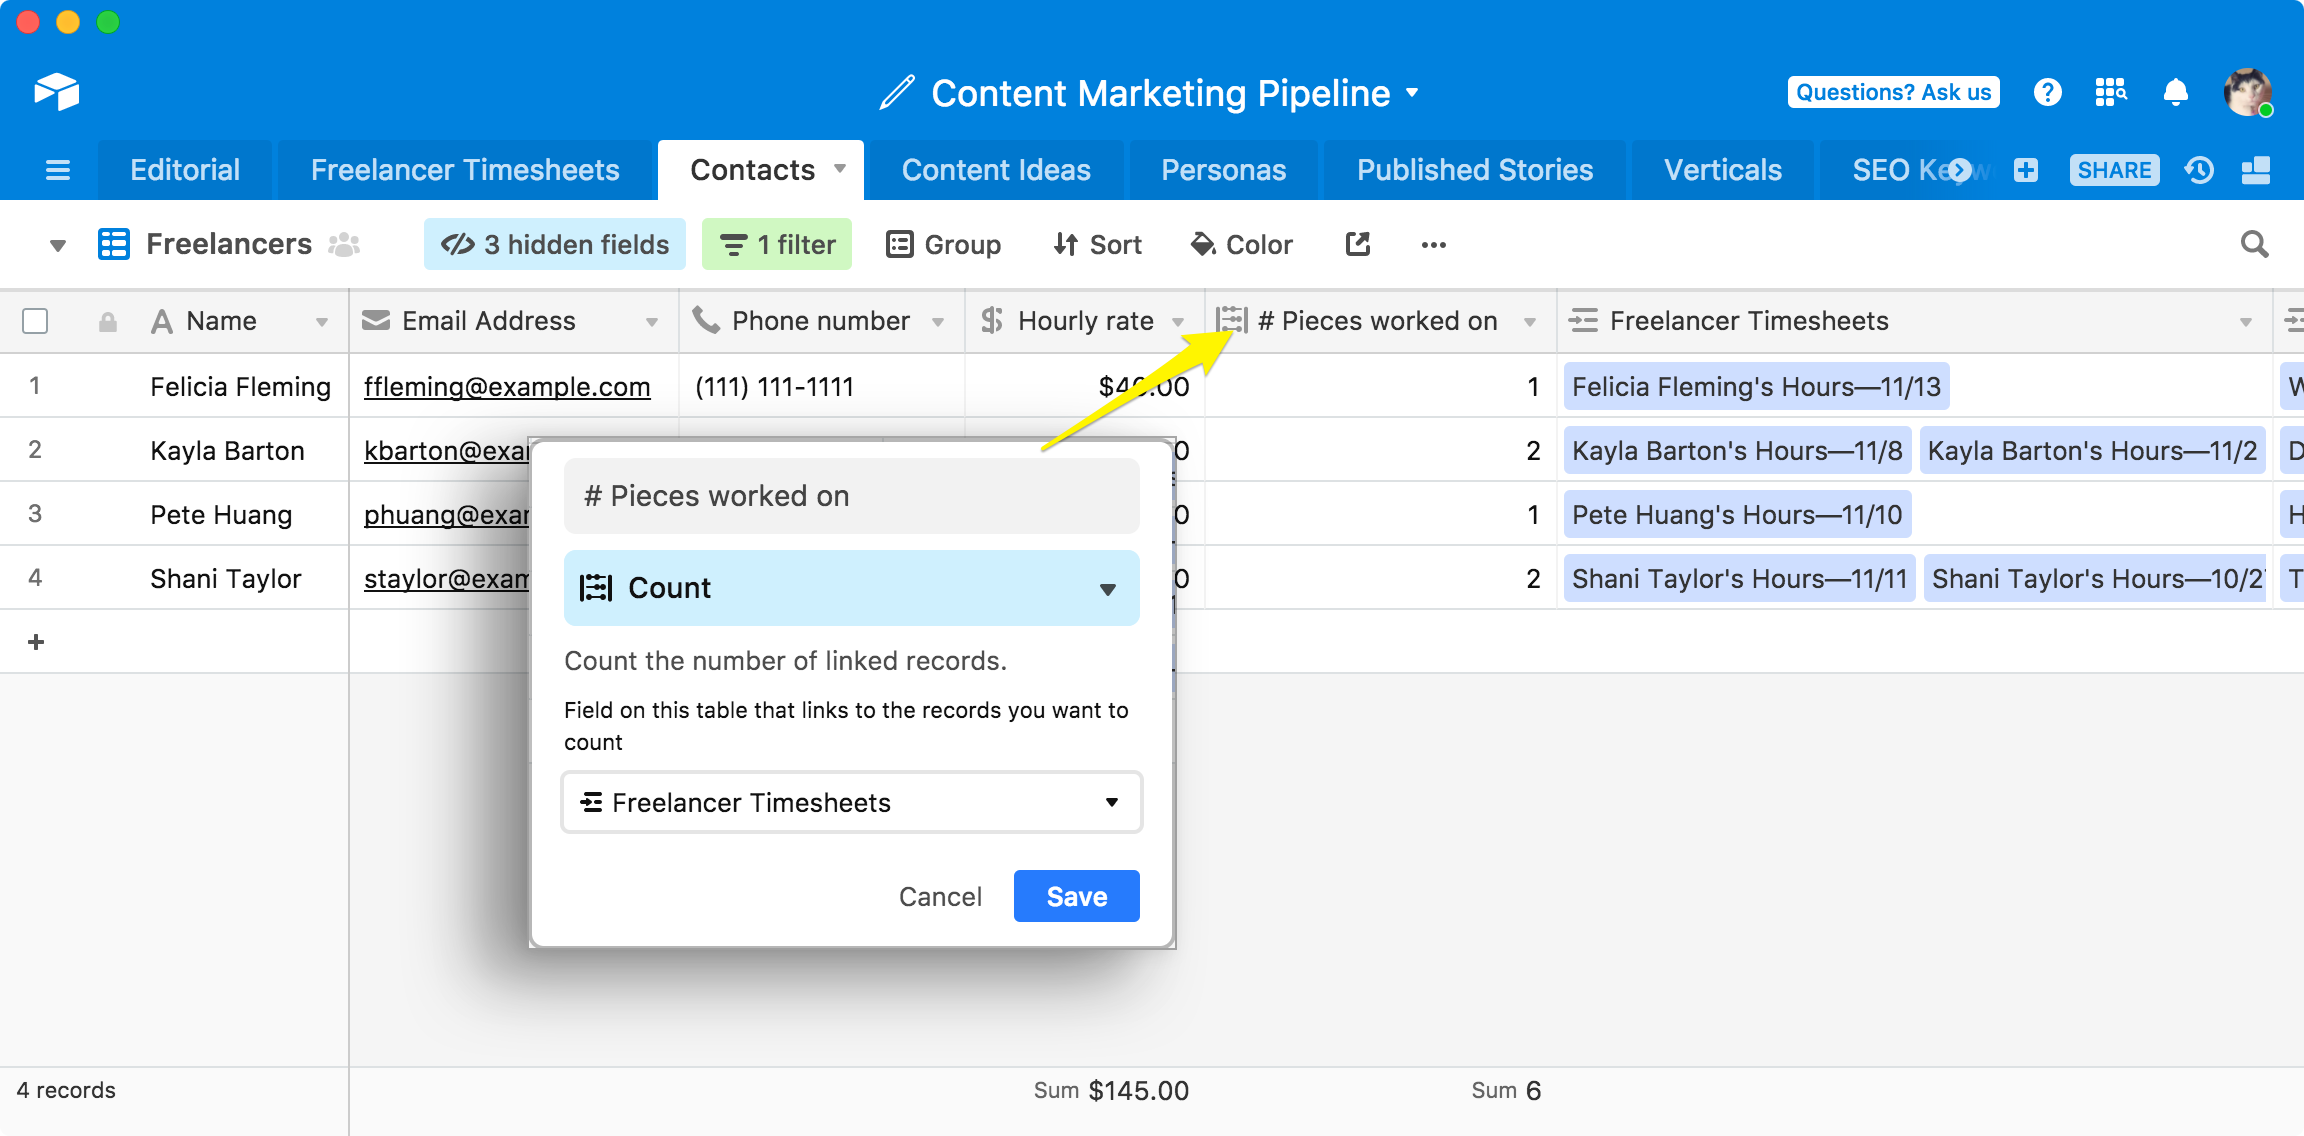
You can automatically track the number of interactions you’ve had with each contact by setting up a count field, which totals the number of links in a linked record field.
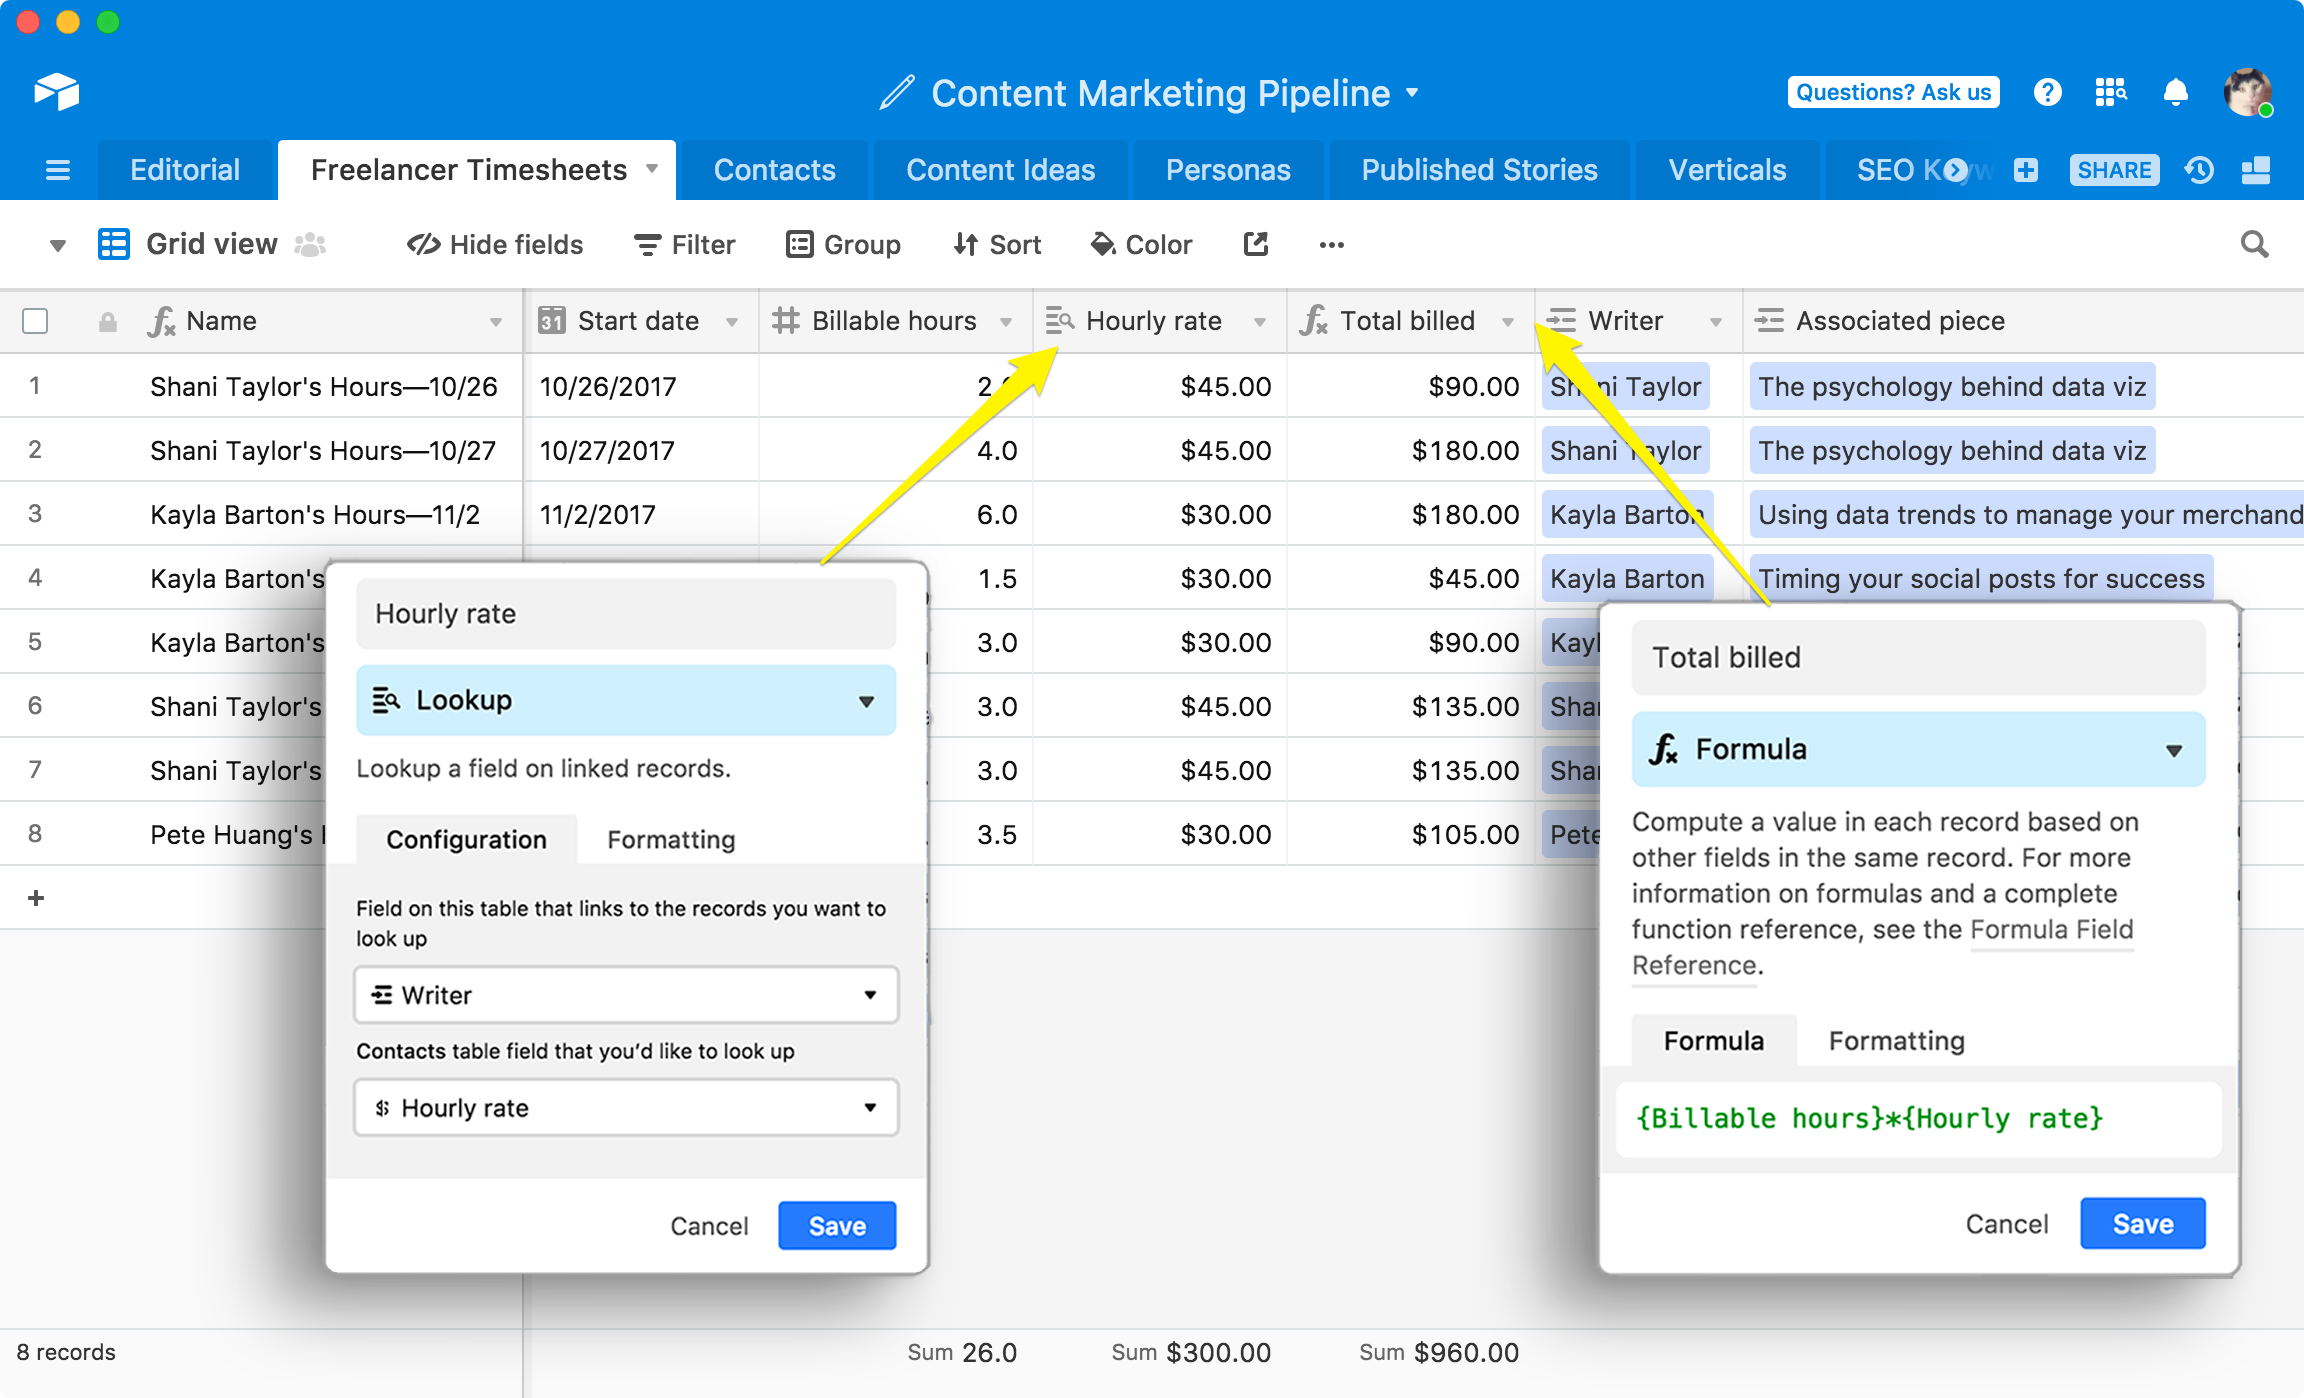
Certain pieces of information—like client email addresses, freelancer hourly rates—are important enough that you might want to see them in multiple tables. You can bring the most important information from one table to another with a lookup field, which uses the links you’ve created to pull information from one table into another table. Critically, lookup fields automatically update when the information in the original, looked-up field changes, meaning that you’ll never have to spend hours of time reconciling discrepancies between different tables.
It’s always useful to be able to see at a glance the last time you communicated with each of your contacts. You can accomplish this easily by creating a rollup field which automatically returns the last relevant date from the interactions table for each contact.
First, create a new rollup field on your table of contacts, then associate that rollup field with whichever linked record field on the contacts table is linked to your interactions table. Have your rollup field roll up the date field values for each interaction, then pick MAX as the aggregation function. This will return the most recent interaction for each contact.

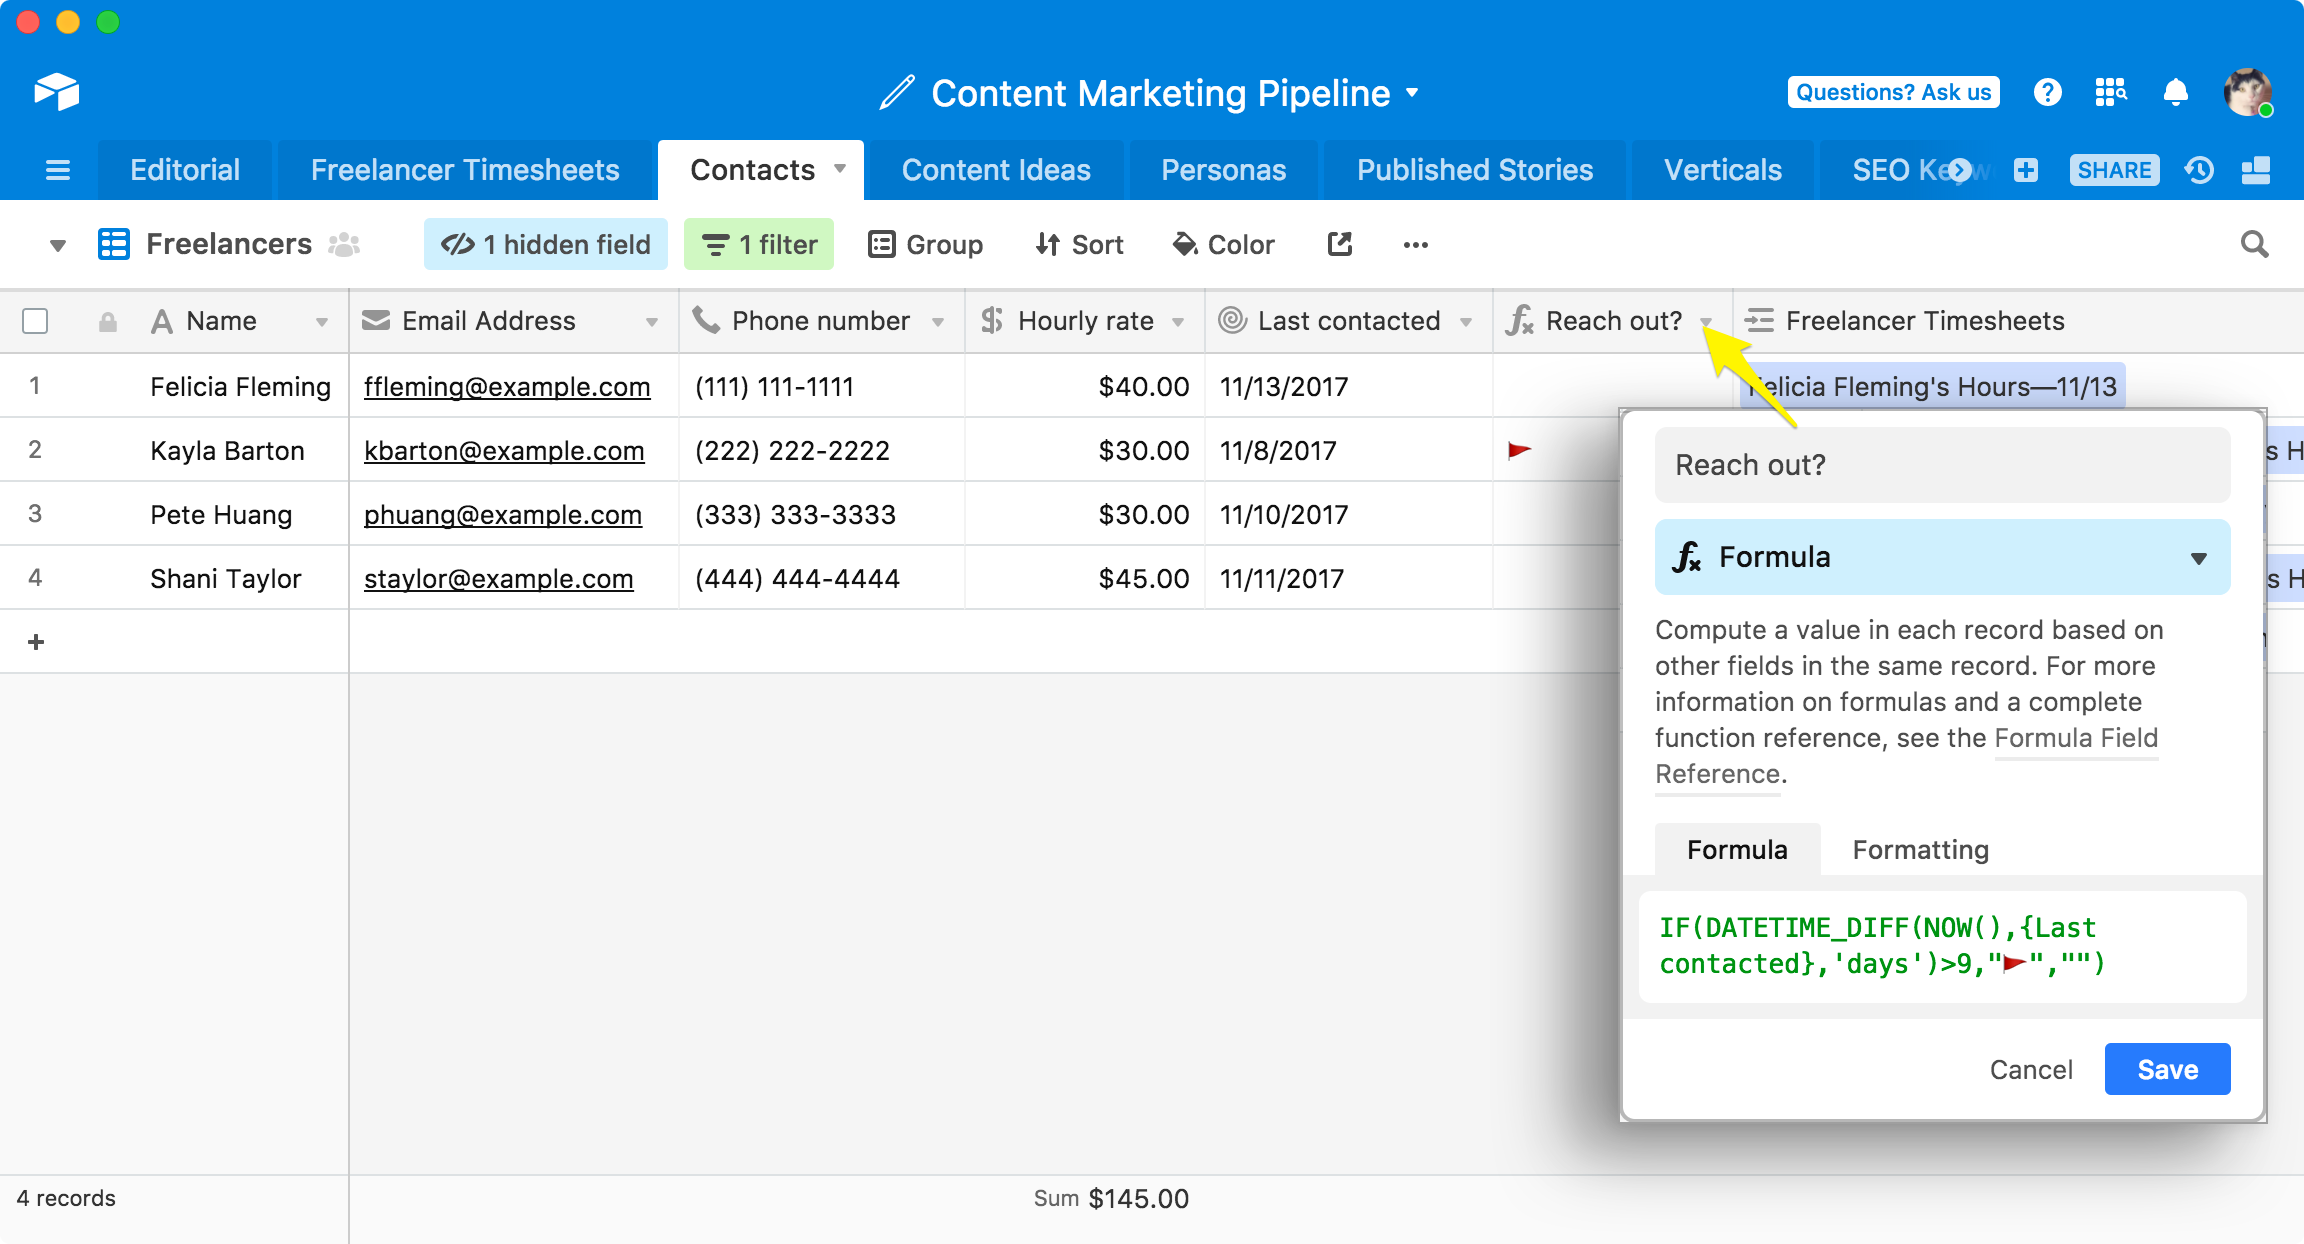
You can automatically flag contacts’ records when a certain amount of time has passed since the last interaction by creating a formula field. This makes it easy to keep track of which people you need to catch up with.
You could go one step further and make a view filtered to only show contact records that are marked as needing outreach, then set up a Slack integration rule so that you'll receive a Slack notification whenever a new record appears in that view flagged for outreach.
You can add a contacts table and an interactions table to almost any workflow—and in doing so, consolidate all that information that you're otherwise keeping in your head or in scattered spreadsheets into a single source of truth.