When writing a screenplay you can make it a basic blueprint or a portal into a world of your creation, but you cannot accomplish the latter without preparation. Here's how you can organize every detail about the world where your story thrives.
Some writers love to outline and others hate the rigidity of the process. Either way, what we'll discuss here should work for you. If you like a standard beat sheet or a Save the Cat-style outline, for example, we'll discuss how you can create those outlines more quickly. If you hate outlining, however, you don't have to—you can focus on establishing character relationships and traits instead. Use the tools and tips discussed in this article to work with your writing style. You don't have to force yourself into any boxes.
Getting started
Before we can jump right in, we have to set up a couple of things. If you don’t already have an Airtable account, create one (a basic account is free) so you can make a copy of the base we’re working with. What’s a base? Take a look:
This base organizes all aspects of a story and the world it lives in. If you look through the tables, you can see we start off with the story beats, but most of them focus on the characters. Regardless of the story you want to tell, you have to tell a story comprised of various characters with different ideas and personalities interacting with each other during a specific period of time.
The story can grow into anything you like, but only as it relates to the actions of these characters. If you know who each character is—what they want, where they begin, and where you want them to end up—the story forms naturally by considering how those characters attempt to achieve their goals in the same place and time. Obviously, you’ll get a boring story if they all agree with each other and live harmoniously, but by defining the characters thoroughly you can understand their perspectives and create compelling conflicts to engage the reader.
Perhaps that’s easier said than done, but this base should help you figure out all the relevant elements. It’s not a rigid formula to create a perfectly typical Hollywood story, but a versatile framework to discover the story in the way that suits you the most.
If you’re ready to give this a try, click the “Copy Base” button at the bottom of the base and let’s jump right in!
The versatile beat sheet
While you ought to put together the beat sheet after defining your characters and their world, let’s check it out first so you know what to expect when begin filling it out. If you don’t like to outline in this way, just skip this section.
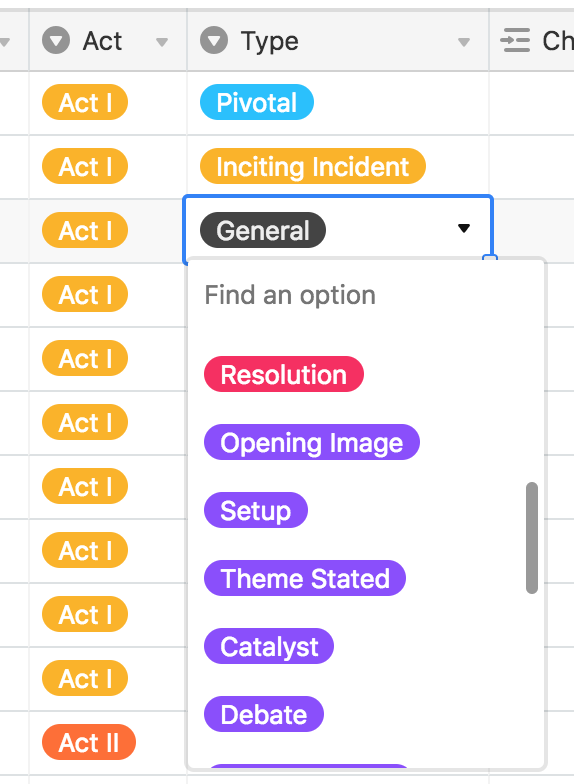
If you take a look at the Beats table in the base you’ll see a fairly standard 40-beat sheet with each row representing one of the beats. You can assign the related act, the type of beat (when you need to note an act break, resolution, etc.), and the characters and locations that show up in that beat. If you prefer the Save the Cat model instead, you’ll find that the Type field already has those types of beats. To differentiate between the two styles, the Save the Cat beat types show up in bright purple.
If you prefer another method of outlining, however, you can just edit this single select field by double-clicking on the column header and adding your own. You can also just add your own on the fly, but that will assign a color automatically. If you want to choose your colors, you should edit it using the first method.
To use the existing 40-beat sheet, you just need to fill in the Synopsis field for each row in the table. Each row represents a beat, so just summarize the beat, assign relevant characters and locations, and move onto the next. If you want to give each of your synopses a little more breathing room, you can also adjust the row height from Short to Tall or Extra Tall. Of course, you’ll want to do this once you’ve established the characters, but now you know how quickly you can put your outline together once you’re ready. You can also change the structure of the sheet to use one of the other outlining methods previously described.
Establish the rules of your world
If you’ve spent any serious time screenwriting you’ve likely heard “you must know the rules of your world” many times. It often comes across as lazy criticism, as everyone has the intention of creating a world with consistent rules, but plot points often betray them.
The Rules of Your World table exists for you to note the rules as you discover them. You can simply add a short description of each rule and the additional details in the provided fields. When you discover a new rule as you set up your story and characters, just add it to this table. This way you can refer back to the rules when you need to know them and have a foundation for how things must work in your story when you get stuck.
This table isn’t fancy, but you don’t need anything fancy. You just need to keep track of how things work in the world of your story. Write them down here and refer to them as needed. It’ll mitigate the headaches that always come with breaking your own rules by accident.
Define your locations
You probably won’t know every location in your story immediately, so don’t worry about filling things out in order. In fact, you really don’t need to worry about filling out any of this base in any specific order—just the order that suits your workflow. We’re looking at this in a linear fashion for simplicity, but you can jump around and add elements as it suits you.
That said, you can probably think of a few locations if you’ve conceived even a small part of your story already. To add them, simply type in a name and description. Afterwards, you can select a type. In most cases, you’ll choose an Interior or Exterior type, as you would when actually writing the screenplay. This menu allows for multiple selections, however, so you can also add types like “Set Piece” or “CGI-Rendered” if those elements help to describe the properties and/or requirements of the location. You can also add your own elements as well by simply typing them or double-clicking the Type header (just like on the beat sheet) and adding new options yourself.
Aside from that, you don’t really have to do much else. You’ll assign these locations to beats on the beat sheet when/if you put a beat sheet together. As for the Character Ownership field, you’ll need to create some characters before you can add them here. We’ll do that next, but for now you can just remember that Character Ownership refers to the character that owns, lives in, or is just primarily associated with that location. Multiple characters may own a home or apartment. A high school gym coach may “own” a gymnasium at a specific high school. This will help you define who holds more power in specific locations so that you immediately know how that will affect any characters who visit that location in a given scene.
As we continue, you’ll see how all these tables relate to one another to help you discover the way your characters will function with other characters and in a variety of different circumstances.
Create your characters
You need characters to create a story, and you need great characters for a great story. You can’t accomplish that if you don’t know who they are. It helps to remain agnostic about each character’s importance, even if the protagonist will always define the story’s perspective. Genuine interactions happen when all characters are the protagonists of their own stories—the same way actual life works. We won’t see most of their details on the page (or onscreen), but those details will inform their every action. You don’t need a backstory for every single body that will appear in your story, but if they have a name, you ought to know who they are.
You can define the basic information here, as you might when introducing the character in your screenplay. Simply add their first and last names, age, and gender, and you’ll have the basics out of the way. Once you’ve added at least a few characters, you can look at filling in some of the other fields as well. Let’s go over each:
- Details provides a space for you to write freely about the character and include any specific information you want to note about them.
- Importance allows you to define whether the character is a lead, a supporting member of the cast, or plays a minor role. You can, of course, add other options if you wish.
- Camp refers to the character’s affiliation with the lead characters. Do they align with the protagonist, antagonist, play both sides, or remain completely neutral?
- Archetypes and Roles let you assign broad definitions to a character. If you jump over to the Archetypes table, you’ll see many common archetypes predefined for you. Because this field links to records in that table, you can just add any of them to associate all of that information with a character. You can also go into that table at any time and make additions or other adjustments. The Roles table functions in the same way, but you define the roles yourself. This is a way to get more specific than archetypes and create roles that you can share amongst various characters (or keep for just one, in some cases). Both of these fields will help you quickly discover how characters relate to one another, in a broader sense, without spending hours attempting to map that out in your head. By making assignments, you can jump into either table and see which characters share archetypes and roles. You might discover certain characters have something in common you hadn’t considered, or you might discover that too many characters are alike. It’s an easy way to learn a lot about the people who make up your story.
- Owned Locations associates the character with a location, as we discussed earlier. You can do this here or in the Locations table. Beats does the same for characters and the beats of the story they belong to.
- Hair Color and Eye Color are simply two common attributes that may matter in the story or down the line for casting. You can define them here if you wish.
- Reference Image allows you to upload any number of images that look like your character. Sketch one out, find an actor’s headshot, or go out and take a photo specifically for this. If you add images for each character, you can click on the view picker (currently set to “Grid view”) in the toolbar and choose “Gallery” from the options. This will allow you to look at your characters as a series of cards with the images you uploaded front and center. (You can create other views yourself, too, if you wish.)
Put it all together
When you’re done, you can return to the Beats table—if you want to—and outline your story with all the elements in place. You can also jump around and organize your story in any fashion you see fit. This base exists as a framework for the story you want to tell and not as a process you have to follow to organize your writing. Organize it however you want! Now you have space for all the elements and predefined relationships to help you see how everything fits together. This way you can spend more time telling the story and far less time figuring out how all the parts come together.