Today’s editorial calendars span digital and print, written features and videos, branded series and native social media content—all created by the same nimble team. Behind the seamless front-page experience your loyal readers have come to expect is a highly coordinated process.
To achieve team goals and keep up the pace of publishing, savvy editors must master both effective, high-level planning and timely execution of individual stories. Any given story might involve contributors in multiple time zones, each responsible for a key step in the production process. As deadlines shift, your team needs to be kept constantly up to date so they can prioritize and plan their own schedules.
Airtable Apps can enable you to keep distributed teams in constant contact, easily update many deadlines at once, give your team quick insights into the big picture, and automate branded assets for social media. It’s all in service of letting editors and writers spend more time focusing on what they do best: creating high-quality content.
Here's your step-by-step guide to getting it done:
Empower your team to plan independently
Keep connected across time zones
Wrangle deadlines and celebrate wins
Automate on-brand visuals
Empower your team to plan independently
Centralized planning is essential for reaching your team’s goals, but too much back-and-forth discussion about individual projects can bottleneck production. Create high-level views of your production pipeline to give contributors visibility into the big picture—and help you keep an eye on how individual stories are progressing.
Keep targets top of mind
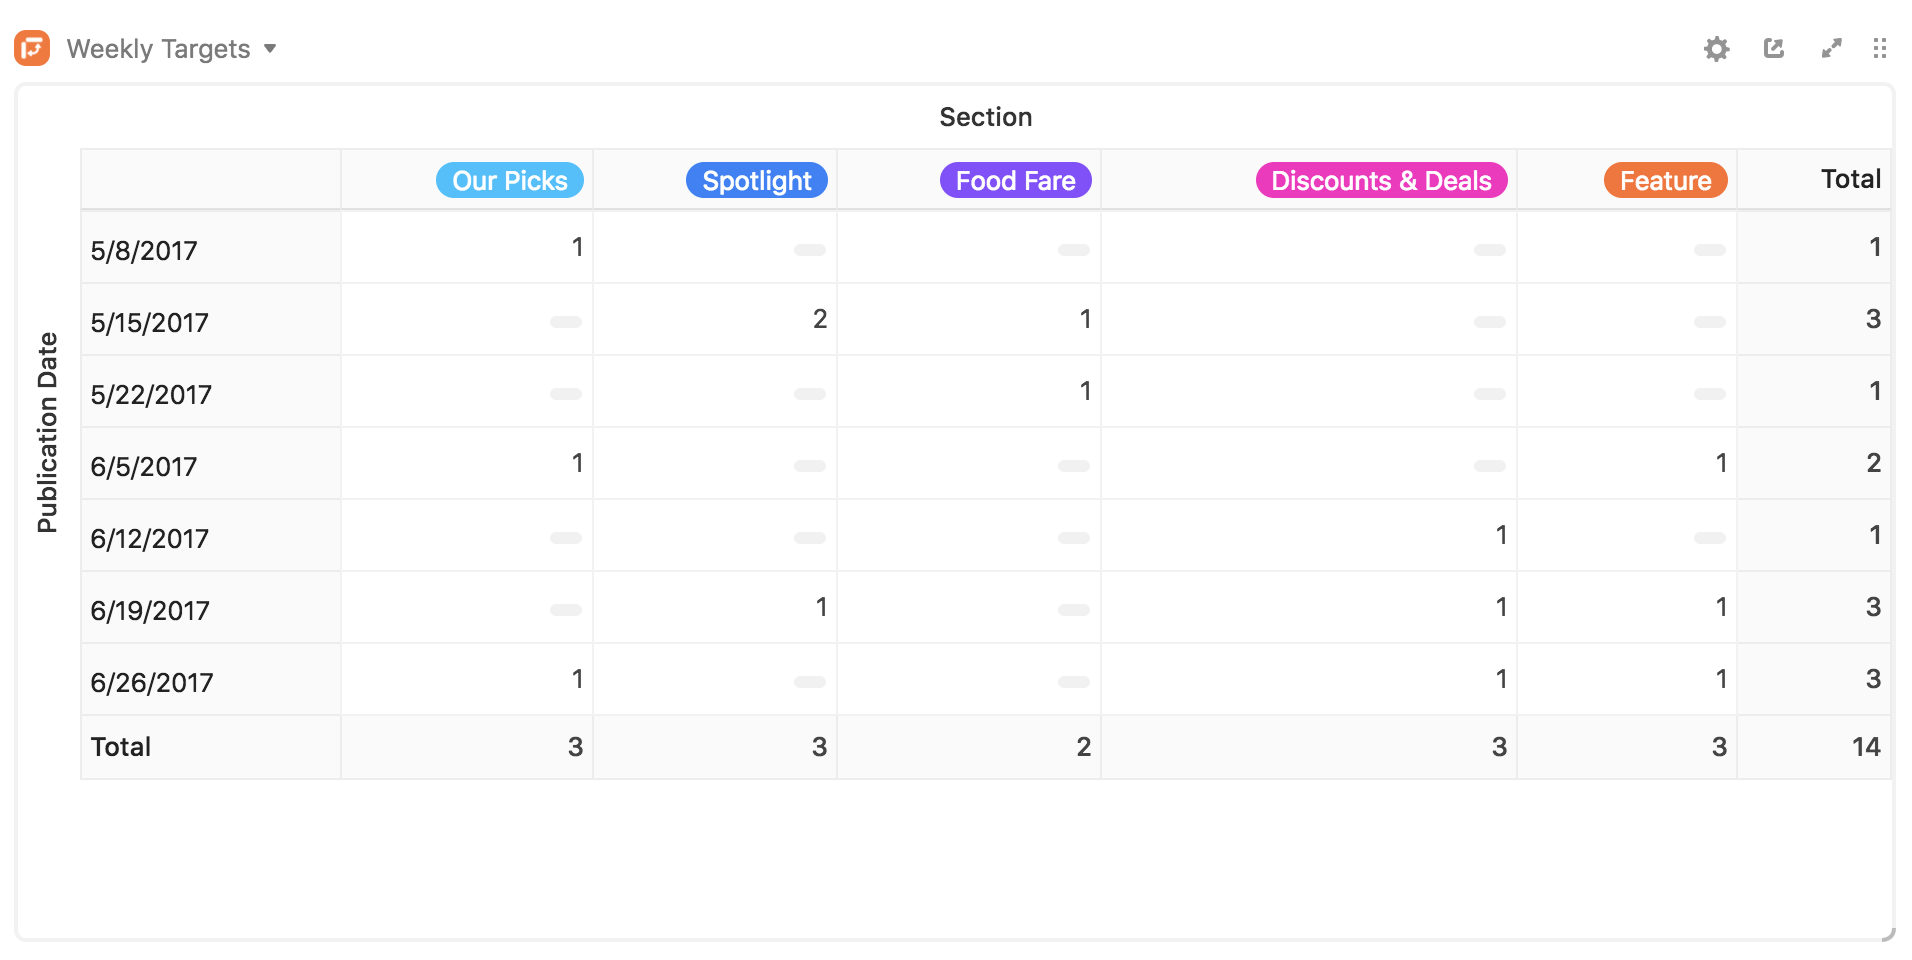
Use the pivot table app to build a real-time snapshot of each week’s planned content, divided by editorial section. Writers and editors can quickly reference which sections need more stories to hit weekly targets.
Step 1: Make a content pipeline table.
If you don't already have one, make sure that your base has a table that lists your content and includes details like owner, editorial section, content type, due date and publish date, and status. (If you want to analyze just a particular portion of your pipeline, make an appropriately filtered view.)
Step 2: Add a pivot table app.
Open up the apps menu, click the add a app option, and add a pivot table app to your base. You can select the table containing your content pipeline in the first field of the app's settings page.
Step 3: Customize the table for your needs.
Depending on what aspects of your pipeline you'd like to analyze, choose a view in the chart app settings. If you're interested in breaking down published content, you should select a view that's filtered to show only stories that are live; if you're interested in seeing the spread of your upcoming content, you should select a view of unpublished stories.
Above, stories are grouped into weeks based on their publish date, and separated by content section. To achieve this setup, select a field that shows the publication date for your row grouping, and bucket the values by week. Then select a field that indicates editorial sections for your column grouping.
Track story status and time spend
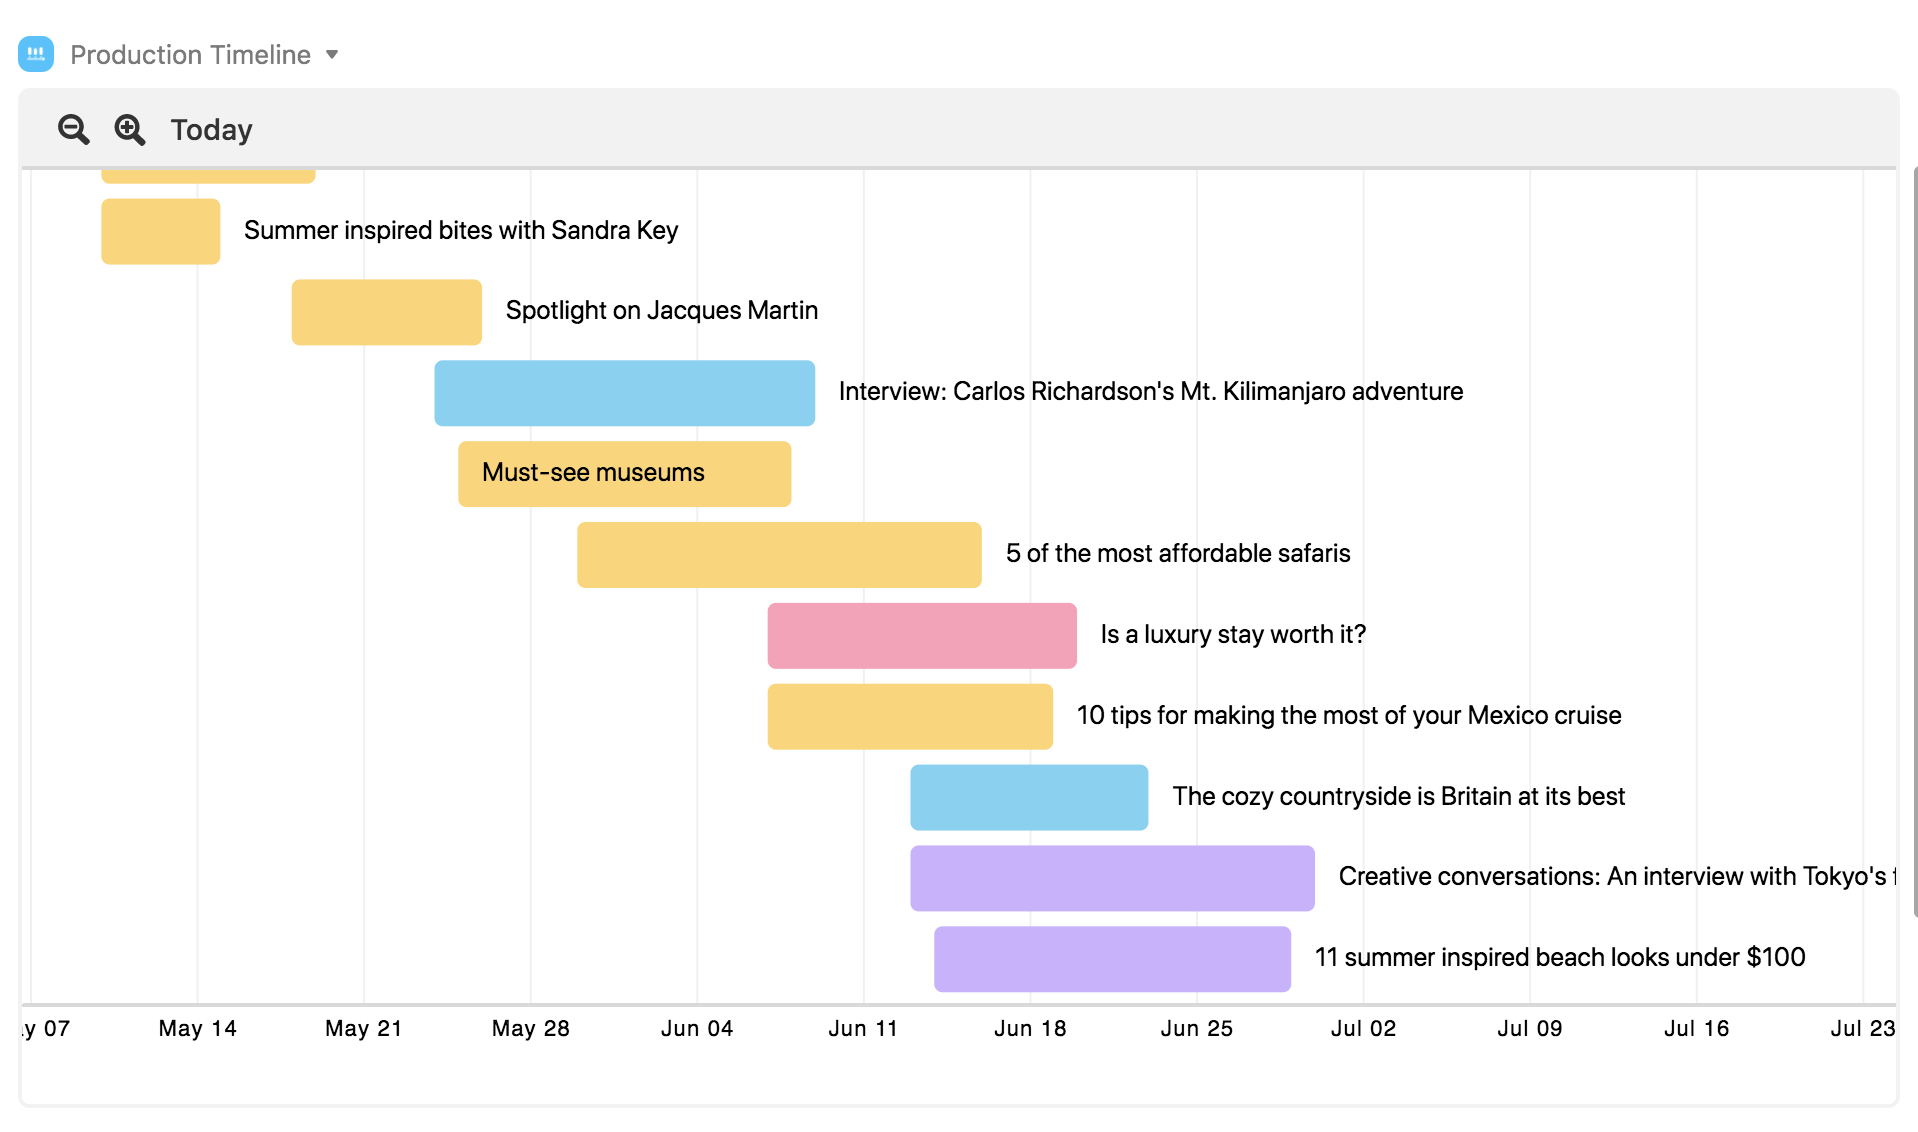
Add a timeline app that shows the current status of every story, as well as how much time each spends in production—valuable for quickly estimating ROI.
Step 1: Add a timeline app.
Go back to the apps menu and click the add a app option, and add a timeline app to your base. You'll want to point the table field toward your content pipeline. Choose a view that corresponds to the set of stories you'd like to visualize over time—this could be a view containing all the content in your table, or a filtered view containing just the content produced by a specific team.
Step 2: Adjust the timeline range and colors.
Choose your preferred start and end date fields. A great option is pairing due date and publish date to quickly see how long a story was in production. You can customize the color of the records on the timeline, too—try coloring according to the production status (as above) or by editorial section.
Check out how to build a marketing calendar to keep teams aligned on ownership.
Keep connected across time zones
Between newsrooms, freelancers, and reporters out on assignment, you’re likely working with a team distributed across the globe. Keep a virtual meeting room handy for real-time collaboration—and use a custom set of clocks to reference local time at a glance.
Host e-meetings on demand without leaving your base
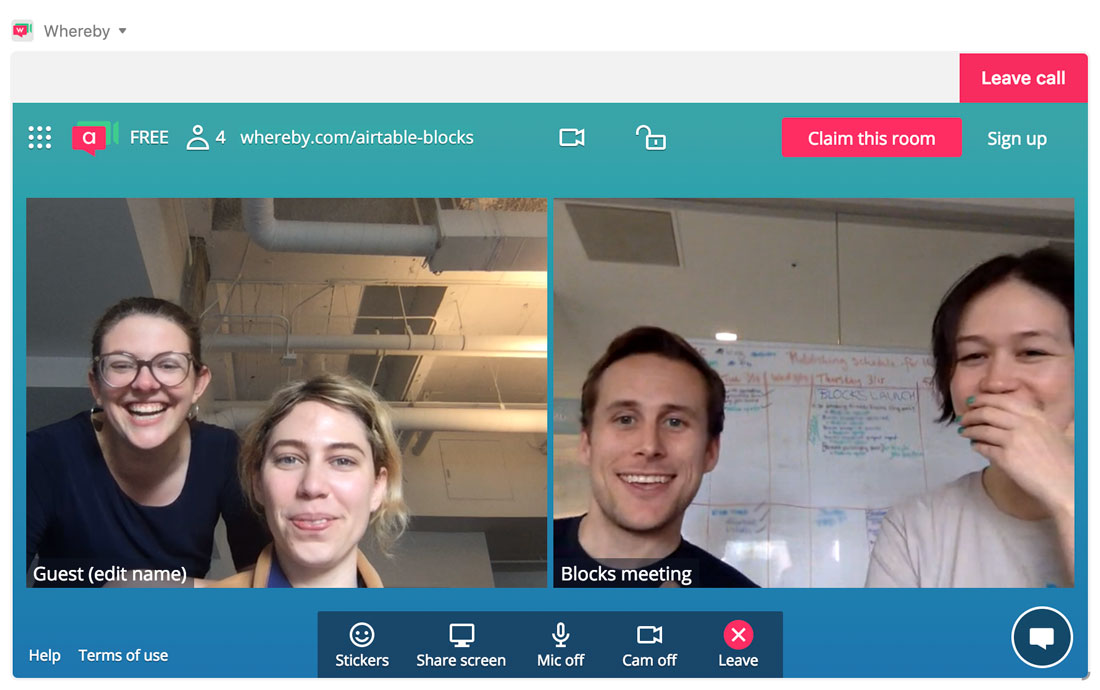
Set up a Whereby or Google Hangouts app to give your team a place to quickly start virtual meetings that anyone in your base can join.
Step 1: Add a Whereby or Google Hangouts app.
Set up the meeting room of your choice by heading to the apps menu, clicking the add a app option, and choosing either the Whereby or Google Hangouts app.
Step 2: Share your meeting room address with external attendees.
Need to meet with a contributor who's not in your base? You can share both meeting rooms with outside stakeholders, and chat with them right inside your base.
For Whereby, you'll set a unique URL for your room that you can lock to uninvited guests. For Google Hangouts, you'll be prompted to login using your Google account, and can invite others directly from the room.
Create a dashboard of your team’s local time zones
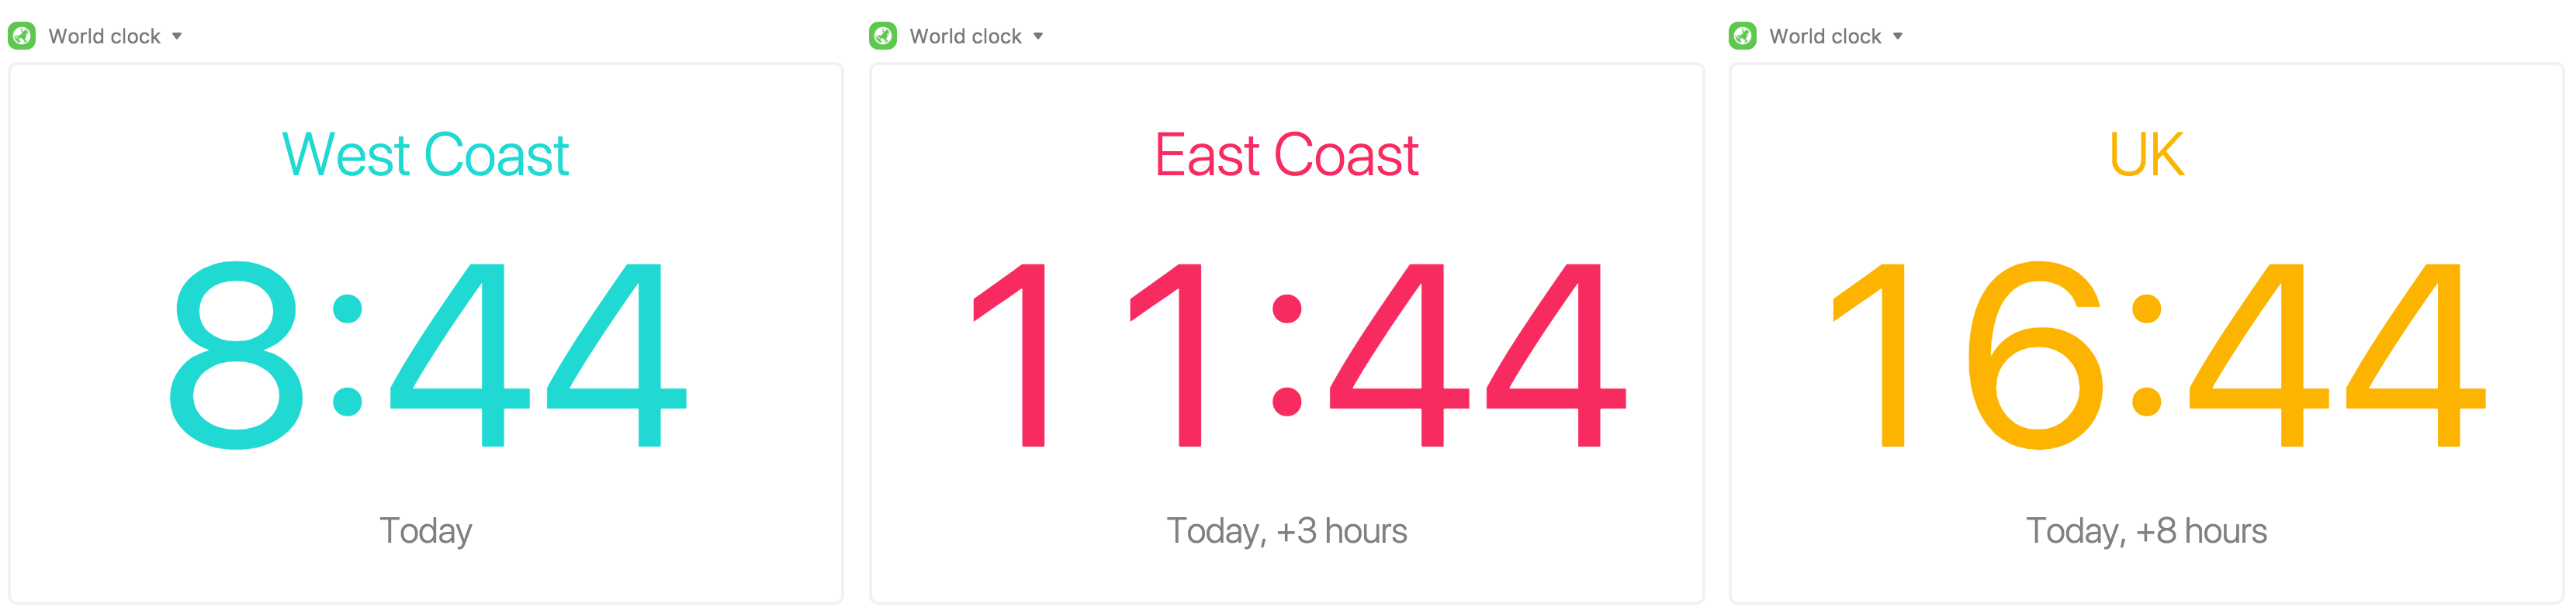
Add multiple world clock apps to display the local times in each of your team’s key time zones.
Step 1: Add a world clock app.
Choose the add a app option from the apps menu, then add a world clock app to your base and select the city whose time zone you'd like to display.
Step 2: Customize the clock's time zone and display options.
You can toggle between digital and analog modes, as well as 12- and 24-hour time formatting. You can change the color of the graphic and apply a custom label if you like.
Wrangle deadlines and celebrate wins
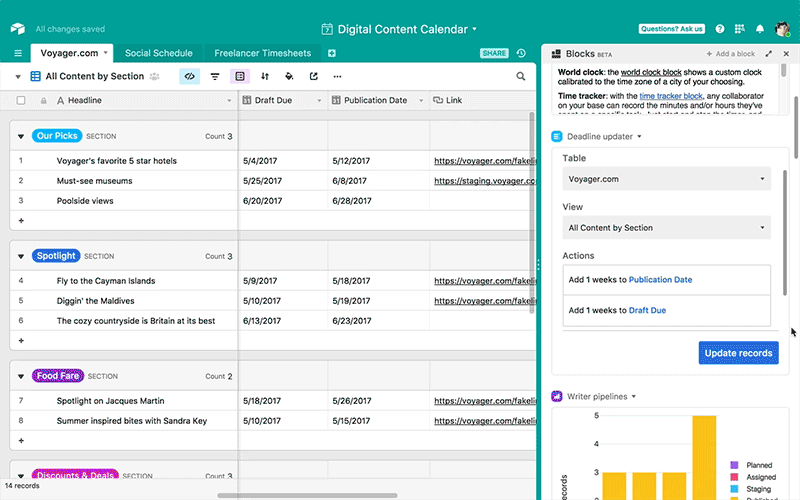
When a story gets delayed, you need to push other content forward to keep publishing at a certain pace. Apps allow you to edit multiple deadlines at once—and give your team extra incentive to publish their stories on time.
Update a set of deadlines with one click
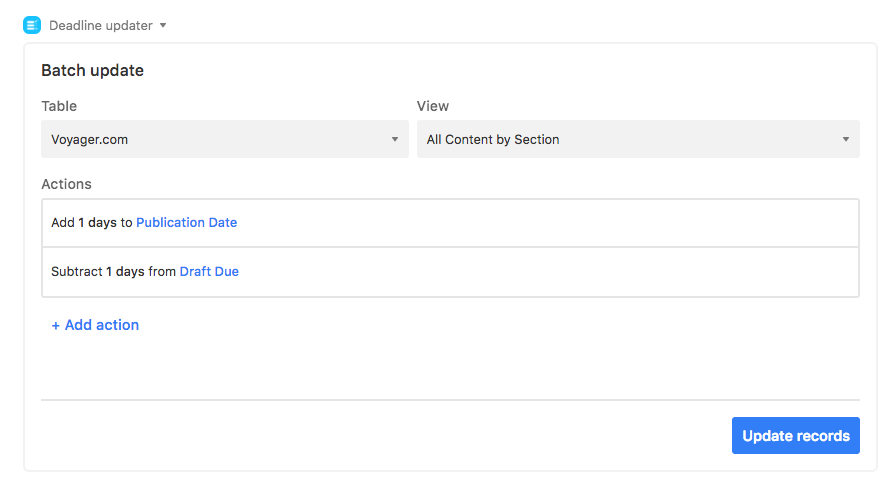
Use the batch update app to push a series of publish dates forward, or move up the due dates for a group of drafts. You can also change a set of dates to a specific date and time, or remove dates altogether.
Step 1: Choose a set of records and make a view.
Create a filtered view that contains only the records you'd like to edit as a group. This could be a set of stories planned to publish in a series, for instance.
Step 2: Add a batch update app.
Go to the apps menu and select the add an app option, then add a batch update app to your base. Then select the table and filtered view that you just set up.
Step 3: Set up editing rules.
You can specify one or multiple actions you want to trigger with a single click. Select the field you want to update and the action you want to take. Above, the first action will increment the publish date by one day, and the second action will decrement the due date by one day.
Tip: You can also use this app to change the status of a group of stories—say, from planned to approved—by choosing to update a single-select field that denotes current status.
Celebrate when your team hits a deadline
Trigger the chime app to toss confetti when a new story goes live—on or before its deadline.
Step 1: Make a view that catches stories published on schedule.
Create a view with two filters: where a post's status is published, and where its publish date is today.
Step 2: Add a chime app.
Click the add a app option in the apps menu, and add a chime app to your base.
Step 3: Shower your team with praise.
Set the app to shower confetti when a new story appears in the view you just created.
Automate on-brand visuals
Give any member of the team the power to illustrate and post their content to social media. Build a rich archive of approved images categorized by subject, then export them to a branded template that automatically creates share-worthy assets.
Use AI to tag your image catalog
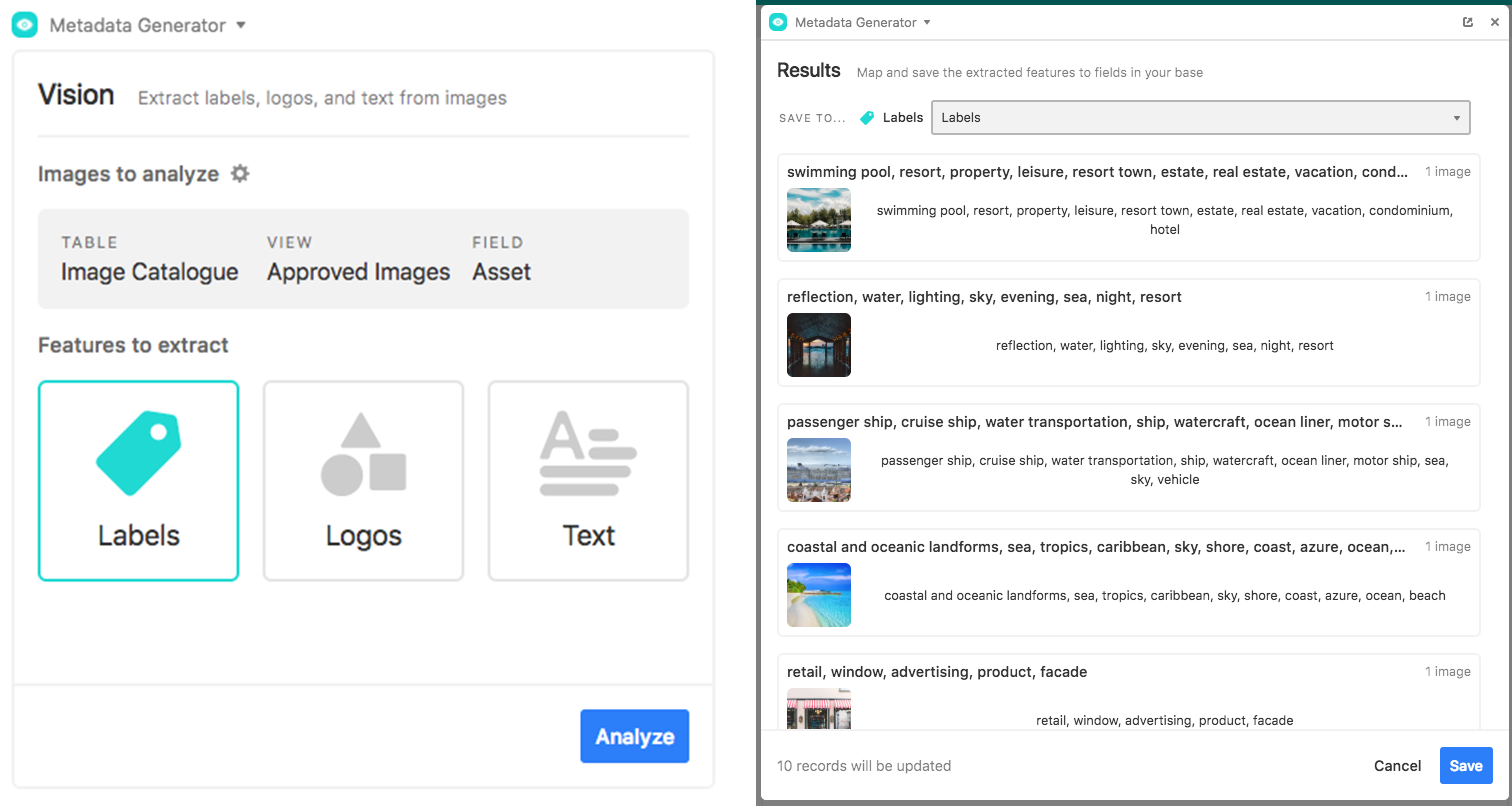
Let Google's powerful Cloud Vision take care of your digital asset management. Use the Vision app to add metadata to a group of images, making them searchable by attributes like color, text, and subject.
Step 1: Create a table of images.
If you don't already have one set up, create a table that hosts all your approved assets in one place. You'll also want to add a long text field for the metadata that you'll generate through Cloud Vision.
Step 2: Add a Vision app and enter your API key.
Open up the apps menu, click the add an app option, and add a new Vision app to your base. Note that to use this app, you'll need to set up a Google Cloud Vision account and locate the API key associated with it. Once you retrieve this key, enter it into the Vision app.
Step 3: Analyze your assets.
Choose your table of images and the attachment field you want to analyze, and the type of metadata you'd like to generate. Cloud Vision can extract labels, logos, and/or text. In the next step, you'll choose which text field you want to write the results to.
(For an extra power-up, once you've run the Vision app, you can convert the text field it writes to into a multiple select field, which will allow you to group, sort, and filter by like attributes across images.)
Instantly generate social media assets
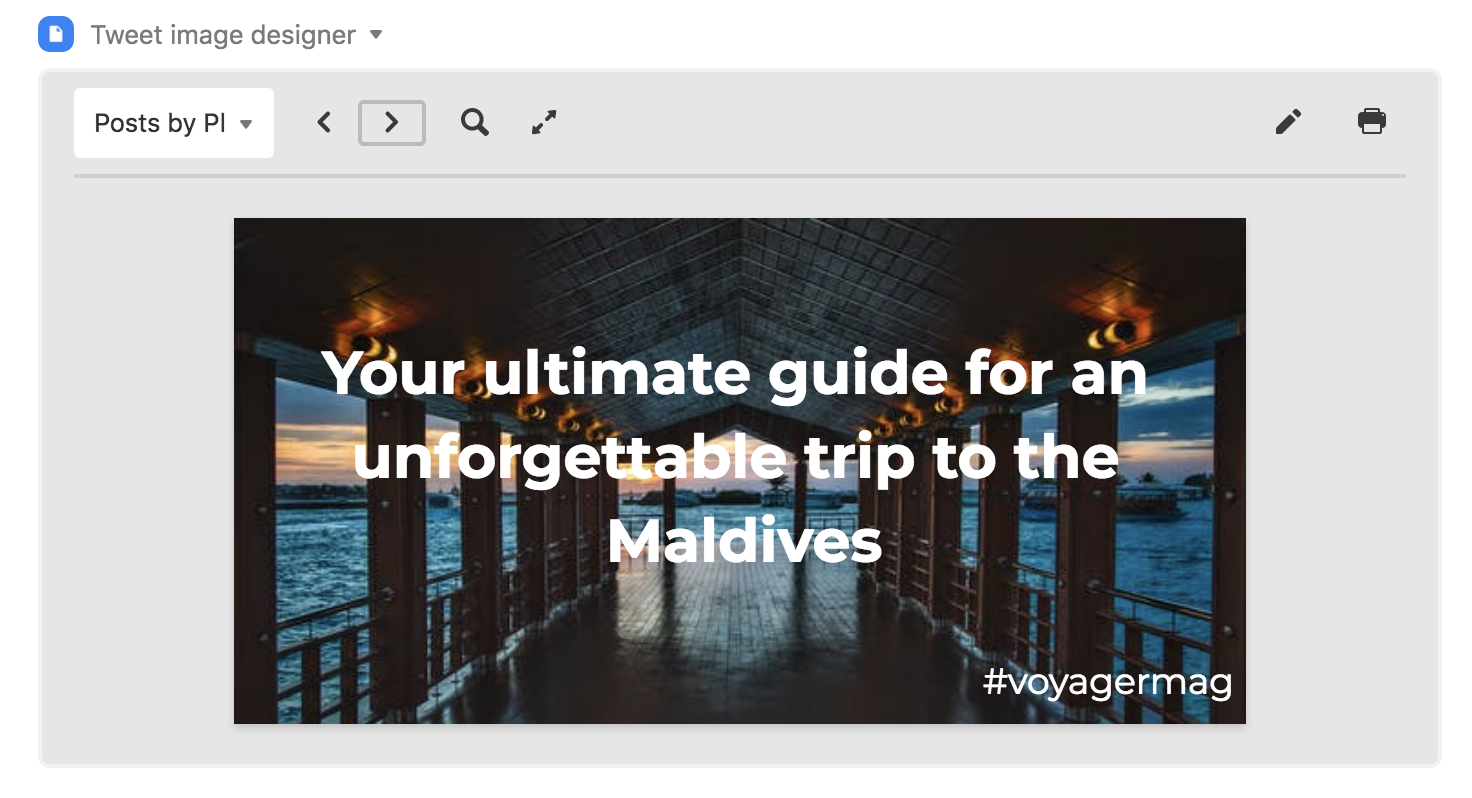
Set up the page designer app to pull data—like images, headlines, sharelines, and authors—from your base into a custom layout.
Step 1: Add your social asset components to your pipeline table.
Now that you've set up your catalog of images, you can easily connect them to stories in your pipeline table through a linked record field. Then, make sure your pipeline table contains a lookup field that brings in the associated asset, and a field for the text that will go on the image. You can add in other relevant fields if you'd like.
Step 2: Add a page designer app.
Open up the apps menu, click the add a app option, and add a new page designer app to your base. Make sure to pick the correct table and view (we recommend one filtered to stories that have images, or are ready to publish). You should select the custom page size and input the dimensions that you'll need for your assets.
Step 3: Design your asset template.
Now, you're ready to unleash your creative vision. Go ahead and drag and drop elements onto the page, tweak fonts and colors, and otherwise adjust according to your aesthetics to make a great template page.
Step 4: Post your images when the time is right.
Once your template is ready, you'll be all set to export custom-branded visuals with one click. You can do it manually if you'd prefer, or you can set up a Zapier integration that will automatically post your image with corresponding text from another field if a certain event triggers (for example, if a permalink is added to a record's URL field—indicating that a story has gone live—which then causes the record to move into a filtered view of live stories).
Can't get enough of Airtable Apps? Sign up for our Apps mailing list to get updated for each new app we launch!