Editors—whether they’re working for a media company, a business’ in-house content team, or a content agency—need to be able to keep up with the frantic pace of the modern digital publishing cycle. They need to be able to execute on individual stories, maintain a consistent publishing schedule, and work cross-functionally with other teams, all with an eye to high-level strategy. Editorial calendars are an indispensable tool for making this all possible: streamlining the entire publishing process to ensure a consistent output of content.
Despite the name, the best editorial calendar isn’t just a calendar: it’s also a tool that allows your whole team to brainstorm ideas, give assignments, track the statuses of all pieces as they move through the content pipeline, and manage content review—all in one centralized, single source of truth. But most of all, the best editorial calendar is the one which matches the needs of your team.
Editors working as journalists, bloggers, content marketers, and more use Airtable to create their own custom editorial calendars. Here are 10 great example templates demonstrating how Airtable users have created their own editorial calendars:
- Basic content calendar template
- Klipfolio’s content marketing calendar
- Laura Blackwell’s structured scheduling for journalists
- Britannica.com’s digital content management system
- Cool Music and Things music blog content tracker
- Content marketing pipeline
- Singularity Hub’s digital media editorial calendar
- QuickBooks Resource Center’s editorial calendar
- Animalz content marketing agency content calendar
- Purple Rock Scissors digital agency content calendar
These templates are all excellent starting points, but you can also make any of them even better for you with a bit of additional customization.
Case study: a journalist's editorial calendar
Let’s take a closer look at one of these editorial calendar templates. This template was put together by writer and editor Laura Blackwell (previously of PCWorld and TechHive), and shows the workings of a fictional satirical news website.
This base uses different field types (which appear as columns, in this spreadsheet-like grid view) to hold different types of information related to each story. Date fields can be used to coordinate scheduling, embargoes, and due dates; colorful single select fields allow you to track the current status of each story, mark the section to which a story belongs, or assign a copy editor.
How to modify an Airtable template to match your editorial calendar needs
Laura Blackwell’s template demonstrates just one of many potential ways you could design an editorial calendar in Airtable. As mentioned previously, the best editorial calendar is one that incorporates the specific elements of your team’s processes and needs, so let’s walk through some of the ways you could adapt this template.
The more you know about your own needs, the easier it will be to make the right adaptations—so before starting, you should answer some questions about your teams’ processes:
- What content formats does your team work with? Does your team exclusively write blog posts, or do you also make videos? What about shareable social images? If your team works with many different content formats, it might make sense to add a custom select field with the different format types to your base so that you can sort and filter by the different formats as necessary.
- What stages does your content go through before it’s published? No matter how complex or simple your pipeline is, you’ll need to make sure that you can easily identify what stage of the pipeline each piece is currently in. Depending on the quantity of content going through your pipeline, you also might want to be able to generate reports with charts or pivot tables to see aggregate information about the content.
- What format(s) do your team members prefer? Some people are drawn to the neat, satisfying grids of a spreadsheet, while others prefer a calendar that foregrounds deadlines; still others prefer project management visualizations like kanban boards. The good news is that Airtable supports all these formats, and more—and every one of your collaborators can view the same underlying data how they prefer.
> What is and how to create a marketing calendar
Adding image and video attachments
If your team works with art assets or videos, your content calendar will be a lot more effective if you can directly associate the relevant files to each story. Fortunately, you can easily add an attachment field, a type of field that can store images, videos, PDFs, and other file types for each record (row) in the base.
To add a new field, click on the dropdown arrow at the top of any field, then select "Insert left" or "Insert right" to insert a new field. Once you do this, you’ll be prompted to select a type for your new field—pick "Attachment," then click the blue "Create field" button to finalize your new attachment field.
Additionally, you can comment on uploaded attachments and even @mention your collaborators to notify them of your feedback. You can also click and drag on an uploaded image to comment directly on a section of the image.
By doing your planning, reviewing, and approvals all in the same editorial calendar—and by giving specific, targeted feedback on your images and videos—you can drive faster, clearer revision cycles, and get your pieces to publication that much faster.
Customizing a field
Every organization works in slightly different ways, so if you’re starting from a template, you’ll still probably want to make some adjustments to the different fields so that they better match your team’s processes. For example, let’s say that our team’s pipeline stages are a little different from Laura Blackwell’s, and we want to try customizing the options in our "Status" field to be a little simpler.
To customize the options for the single select "Status" field, click on the dropdown arrow at the top of the "Status" field, then select "Customize field type." From here, you’ll see the list of available options.
You can rename existing options by clicking on an option's name; add new options by clicking the "+ Add an option" button at the bottom of the list of options; remove options by clicking the X next to the option you want to remove; reorder the options by clicking and dragging the options with the drag handles; or even pick a different color for each select option by clicking on the color flag to the left of the option name.
Making custom views
You can further customize your base by creating different views, which are like different lenses through which you can see the same data. By hiding fields, adding filters, and applying sorts, you can create new ways to look at the table that are optimized for different purposes. These views can be saved so you can quickly reference them for future use.
For example, each editor could make their own view, which only shows the stories to which they've been assigned. If one of our editors, Allison, wanted to have a filtered view that shows only the story records for which she is an editor, she could click on the filter button in the view configuration options, then add a filter stating "Where [Editor] [is] [Allison]".

Up to this point, we've been looking at grid views, which format the editorial content into columns and rows like a spreadsheet. However, views can also be of different types, which will format the underlying data in different ways: for example, if your table has at least one date field, you can look at your pieces on a calendar, or if your table has at least one single select field, you can organize your pieces into stacks on a kanban board.
To make a new view, open up the view sidebar, then click the appropriate button under the "Create a view" section.
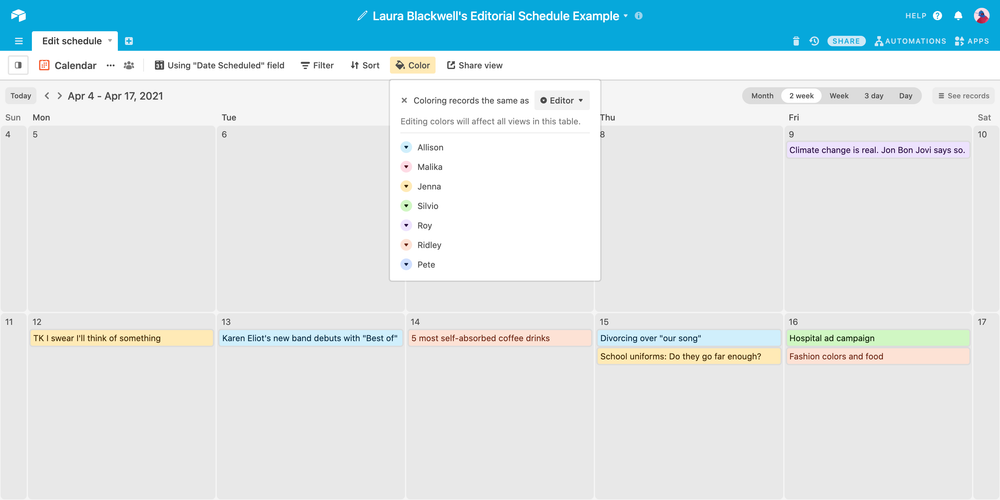
Calendar view makes it easy to change a story's publication date when you're inevitably forced to reschedule. It's as easy as dragging and dropping the record to a new date—and when you make these changes, you're actually changing the underlying data, so the scheduled date changes in every view simultaneously, for every person viewing the base.

You can even add color-coding to make it easier to identify important information at a glance when looking at your calendar.
If you have project management-oriented teammates who like kanban boards, then try making a kanban view, in which your pieces are visualized as cards in stacks.
Kanban views are especially useful for seeing the progression of stories. If you make a kanban view where your pieces are stacked by the "Status" field, you'll see your production pipeline visualized.

Similar to what happens if you click and drag records in calendar view, if you click and drag a kanban card from one stack to another, you’ll automatically update the status for that piece across the entire base.
Blackwell’s template is just one way in which you could construct an editorial calendar in Airtable, but as you’ve seen, you can make any template your own by changing and adding your own field types, creating custom views, and more. Check out her template to see it for yourself—from there, you can make your own copy and edit it as you’d like.
We also have hundreds of additional examples of how people use databases for everything from marketing and video production, to nonprofit management and product planning, to UX research and sales: just check out Airtable’s extensive gallery of free database templates.
This post was originally published April 28, 2016 and substantially updated in 2020.